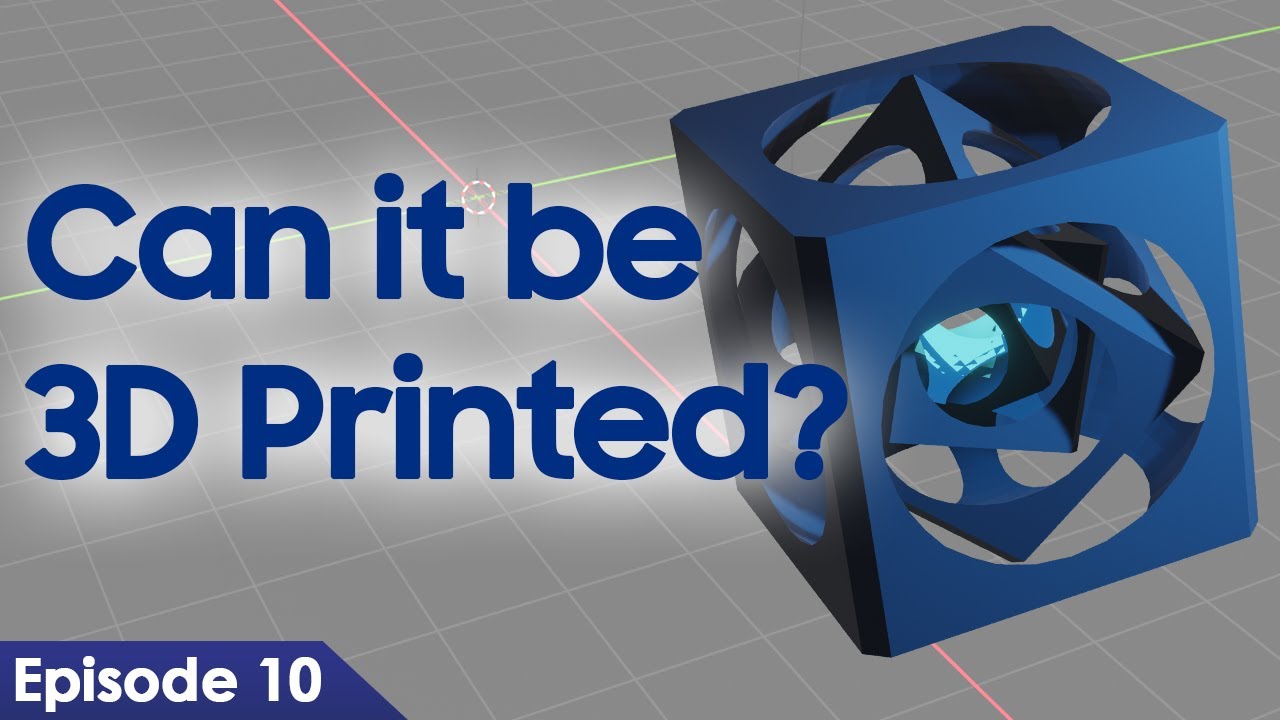
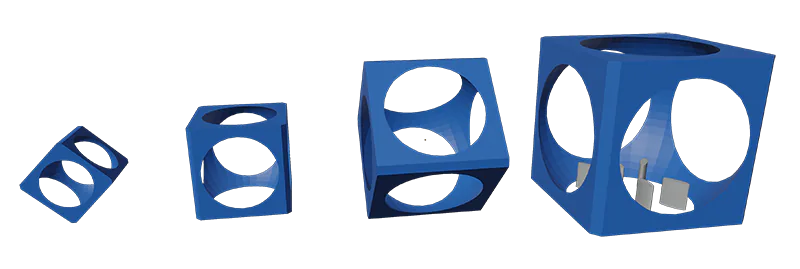
Four cubes nested inside one another, printed as a single piece, with almost no automatic supports. Part experiment, part tutorial, and a genuinely tough stress test for any 3D printer. Here is how I modeled it and got it to print.
Editor's note (July 2026): This project is from 2021 and was printed on the Maker Select V2 and the Monoprice MP10 Mini, both discontinued now. The modeling and printing techniques here, especially the support-free approach, still apply to any printer. If you want a current beginner machine, I use and recommend the Creality Ender 3 V3 SE, linked at the end.
The goal was to print four concentric cubes as one object, with the inner cubes free to move, and to do it without the messy automatic supports a slicer would normally add. The trick is design: spherical cut-outs act like arches, corners are braced with tiny custom supports, and gaps are crossed using bridging. Sliced at 50mm across with 100 percent infill, it prints on a budget machine and makes a fun desk piece. The Blender and STL files are on Thingiverse.
A support-light print that doubles as a real stress test.This one is part creative experiment, part tutorial. The object is four cubes inset one inside the next, a little cube inception, and each inner cube is free to rattle around inside its parent. I learned a lot getting it to actually print, so I want to walk through it from concept to finished piece. Much like the Benchy from earlier episodes, it turns out to be a great stress test: it pushes bridging, overhangs, and support removal all at once.
I modeled it in Blender. If you have not started with Blender yet, I highly recommend it for anything CAD or 3D printing related. My beginner series covers the move from SketchUp to Blender if you want a running start.
The individual cubes are surprisingly simple to model, and that simplicity is exactly what makes them printable. For once, we get to use Blender's default starter cube. Then:
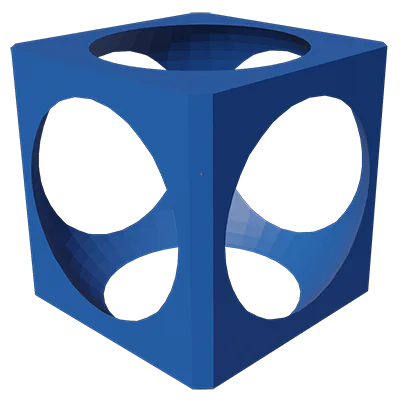
You are left with a cube that has a spherical hollow cut into it. That becomes the outermost cube of the model, and as we will see, that hollow is the secret to printing the whole thing without much support.
The payoff of that design, beyond looking cool, is that it prints with almost no programmed supports. If you are new to the term: supports are extra scaffolding a slicer adds under overhangs that have nothing beneath them. In Cura they appear in a turquoise color, and the slicer flags the areas it thinks need them by shading the underside of your model red. Cura believes those spots cannot print unsupported. We know better.
Supports are helpful, but they cause problems too. They are meant to break away, yet they still leave remnants behind, and on intricate models those leftovers are a pain to clean without snapping the print. They are especially awful to remove from a model with enclosed interior spaces, which is exactly what we are building here. So the whole goal is to design the model so the slicer does not add them in the first place.
The physics of most printers means a flat surface cannot lean much past about 70 degrees before it needs support underneath. The beautiful thing about this design is that the spherical hollows inside the cubes are essentially arches. Just like in civil engineering, an arch can span a real distance during the build with no support, because each layer prints a fraction of a millimeter further inward than the last, held up from below, creeping in until the arch closes.
Printing the outer cube is settled. The challenge is insetting the other three cubes so they all print at the same time, in place. I wanted each interior cube small enough to move freely but big enough that it cannot fall out of its parent.
The first interior cube is a copy of the original, scaled down about 15 percent. Leaving it sitting flat inside the parent will not print, so the fix was to rotate it 45 degrees on the Y axis and print it on its edge, resting on the bed. None of its faces then hang more than about 50 degrees, so with the arch trick already in play it needs no extra support. The one caveat: I beveled the four bottom edges so there was a flat spot to print on, and then beveled all the cubes to keep the look consistent.

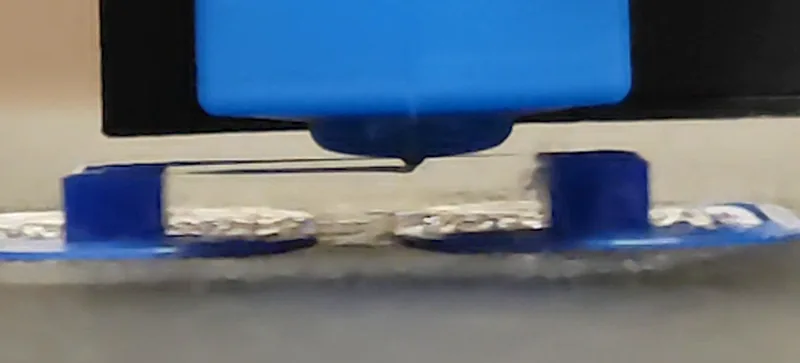
The second interior cube was trickier: it basically floats in mid-air, with no part touching the bed. After wrestling with it, I realized there was just enough room to add my own minimal supports under it. The trick is to support the corners, since those are the points the print head travels to and from, and then let bridging handle the rest. Bridging is the printer's ability to connect two points with no support in between: as the nozzle extrudes across open air, it drags the filament along and spans the gap.
How far you can bridge depends on the printer. I ran tests and found the V2 bridges roughly 60mm before it sags too much, and the MP10 Mini does the same. So I only needed to support from each outer corner to the interior edge, at about 45 degrees toward the center. That led to a simple oblong oval support that props the corners, holds the cube as it prints, and pops off easily afterward. A test print of that cube alone came out promising, with barely any sag while bridging all four sides, and the supports broke away cleanly.
The third interior cube took its cue from the second. I stood it on its edge as well and gave it two more custom supports. As a bonus, those extra supports also brace the second cube from below. It does not strictly need the help, as the test proved, but it does not hurt. A solo test print of this cube confirmed the theory: not perfectly clean, but the physics held, which was my main concern.
In Cura I scaled the model to 50mm across. That size is the sweet spot: big enough that all the cubes come out mostly clean, small enough that the bridging on the inner cube stays within range. I set infill to 100 percent to make it essentially solid, which also stiffens the smaller cubes. It adds to the print time, but lower infill left the small cubes too fragile, so 100 percent won out. There are other settings you can tweak, like retraction speed and distance or wall thickness, but I would leave those at your printer's known-good values and adjust based on your own results.
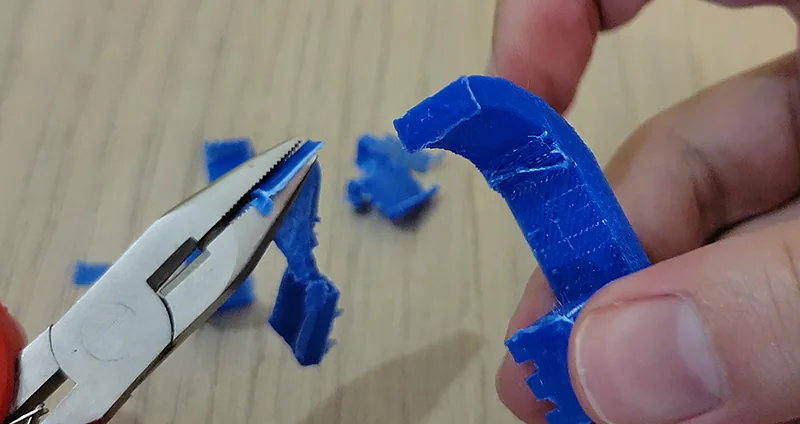
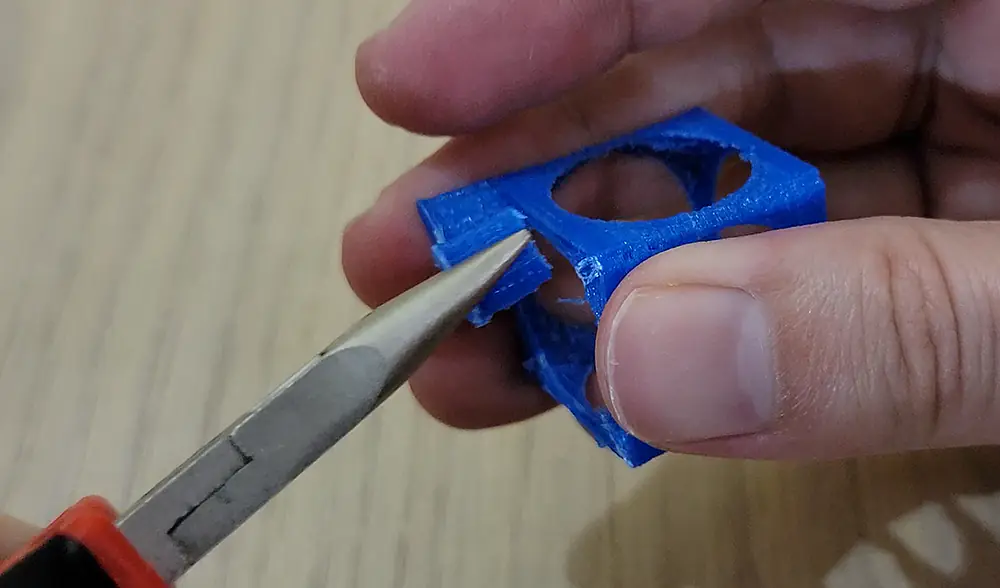
Cleanup takes a little finesse. Removing the bed adhesion layer and breaking off the supports is the delicate step. Gently hold the inner cube while you work the supports free. I found that bending them side to side a little and then twisting snaps them off cleanly. Needle-nose pliers work best, though scissors will do in a pinch.
A cleaned-up cube is oddly satisfying to fidget with and makes a neat desk piece. My results could use more refinement, and I will explore some of those improvements in future videos, but the physics all worked. I put the Blender source and the STL up on Thingiverse so you can print one yourself. I would love to see how they turn out for you.
It is four cubes nested one inside the next and printed as a single object, with each inner cube free to move inside its parent. It prints in place in one job, with almost no automatic supports, thanks to the way the cubes are modeled.
Often yes, if you design for it. Most printers can handle a surface up to about 70 degrees before it needs support, and arch shapes can span gaps on their own because each layer creeps inward from the one below. Combining arches with bridging lets this model print with only a few tiny custom supports.
Bridging is the printer's ability to connect two points across open air with no support underneath. As the nozzle extrudes while moving to the next point, it pulls the filament along and spans the gap. In my tests both the Maker Select V2 and the MP10 Mini bridged about 60mm before sagging too much.
I scaled it to 50mm across and used 100 percent infill. That size keeps the inner-cube bridging within range while printing cleanly, and full infill stiffens the small cubes so they are not too fragile. Lower infill left them delicate, so I stuck with 100 percent.
Yes. Like a 3DBenchy, it exercises several of a printer's abilities at once, including bridging, steep overhangs, and clean support removal in tight interior spaces. If your printer produces a clean cube inception, it is handling those challenges well.
This project started as the next step in my new Blender-to-Cura workflow, and it stress-tested that workflow nicely. It printed on the same MP10 Mini I set up in the MP10 Mini review. Give the files a try, and if you improve on the design I would genuinely like to see it.
Disclosure: This post contains affiliate links. As an Amazon Associate I earn from qualifying purchases, at no extra cost to you. CK Tech Check is 100% ad-free: no banner ads, no ad tracking. Affiliate links like these and my YouTube channel are what keep the site running.