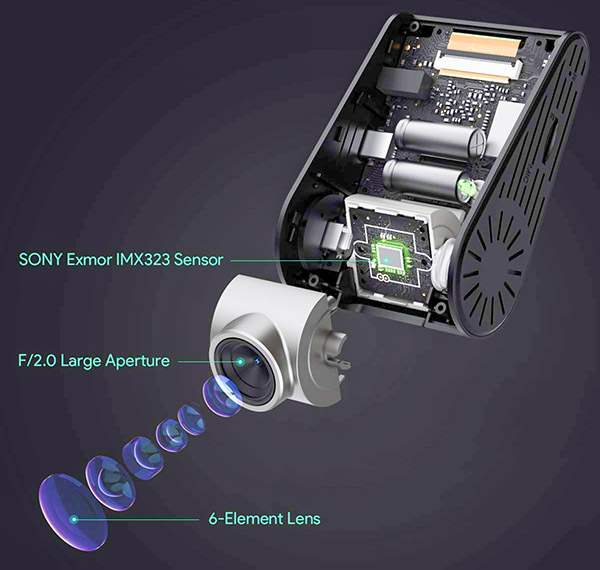
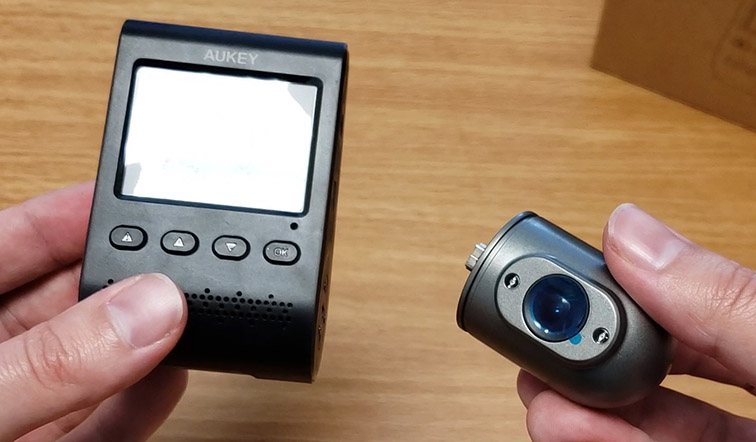
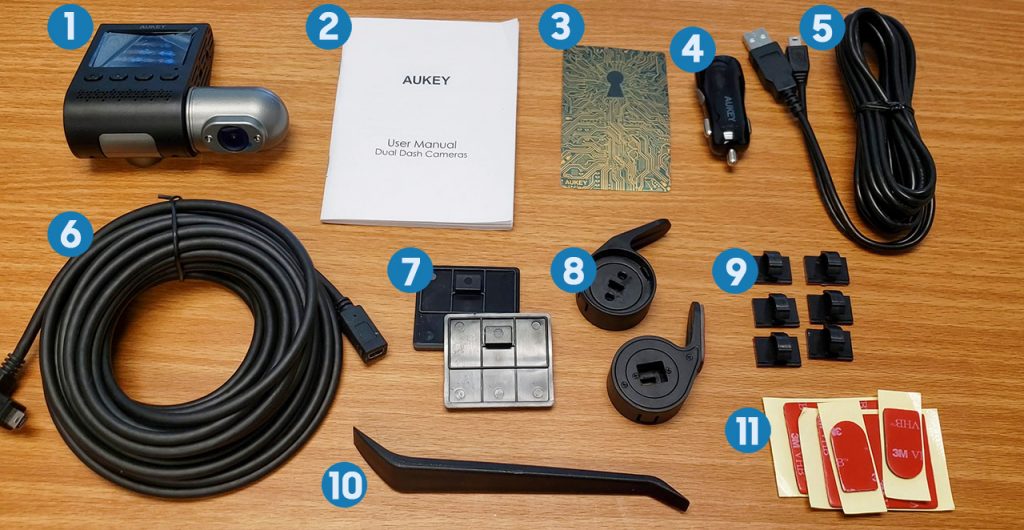
CK Tech Check logo

AUKEY DRS2 Detachable Dual Camera Dashcam Review

0 %
Overall Rating

Looking to update your dashcam? This guy is it, powerful and versatile

AUKEY DRS2 Dual Camera Dashcam

Full Product Name

AUKEY Dual Dash Cam 3 in 1 FHD 1080p IR Night Vision Car Camera 170 Degrees Wide-Angle Dash Camera for Cars with Supercapacitor, WDR, Motion Detection, G-Sensor, Loop and Dual-Port Car Charger

Intro

Several weeks ago Aukey reached out to me to ask if I would be interested in checking out their new dual camera dash cam model DRS2. When I first saw this model I was intrigued by its design and its potential so obviously I was all over it. There’s even more to this little camera than meets the eye at first.

Full Review

Watch the overview video or keep reading the full article below

Table of Contents

What’s In the box

Right off the bat the packaging for the DRS2 is pretty beefy, definitely not your standard cardboard box with some flimsily flaps.

In the box you get the dashcam, we’ll swing back around to it momentarily. Next a 13ft / 4m mini-B USB cable to power the dashcam. A 2amp car power adapter with two USB ports so that the dashcam doesn’t completely occupy an outlet. The owner’s manual in a selection of languages, the signature Aukey warranty card that’s also a cool sticker, is dashcam comes with a 2 year warranty! Two dash cam mounts, one with 3M double sided tape, 6 cable loops, each with tape, some extra pieces of tape for those mounts, and a trim removal tool, a nice addition that will be useful for installation!

These next three items will give you a hint to a very cool feature of the DRS2. First a proprietary 23 foot 7meter male to female mini-B USB cable and two more mounts of a different variety, again one with tape on it and the other without. That’s quite an assortment of stuff you get in the box, I love how Aukey provides spares for both mounts, just in case. Now let’s see how they all work together by taking a closer look at the dashcam.

AUKEY DRS2 Dual Camera Dashcam components
DRS2 Dashcam Body 1 of 11 User Manual 2 of 11 Warranty Card – 24 Month Warranty 3 of 11 Power Adapter 4 of 11 13ft/4m USB Power Cable 5 of 11 23ft/7m proprietary USB Data Cable 6 of 11 
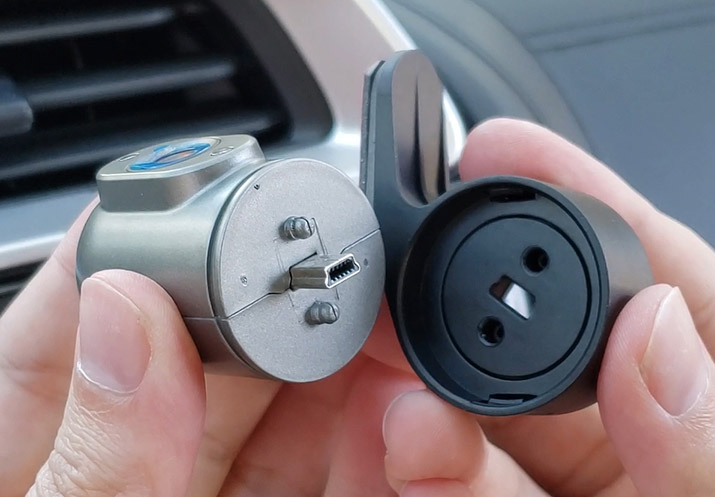
Dashcam Mounts 7 of 11 Second Camera Mounts 8 of 11 
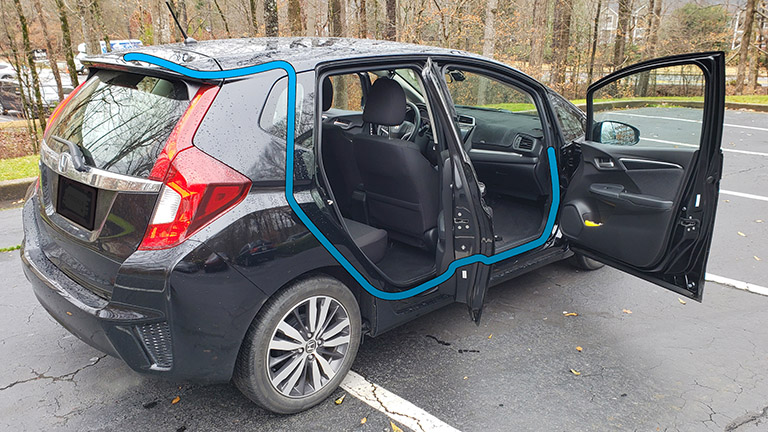
Cable tie downs 9 of 11 Trim Removal Tool 10 of 11 Extra Tape 11 of 11

1 – DRS2 dashcam body
2 – User manual
3 – Warranty card
4 – Car power adapter
5 – 13ft/4m USB mini-B power cable
6 – 23ft/7m proprietary USB mini-B cable

7 – Dashcam mounts
8 – Second camera mounts
9 – Cable loops
10 – Trim removal tool
11 – Extra Tape

Dashcam Overview

My initial impressions are that it feels like a quality piece of engineering, clean with a subtle design that I love, all though the gray housing around the cameras does push my OCD button, I would have preferred it to be all black like my DR02 but I’ll have to see it in place before I pass my final judgment. Overall though it feels like something that will stand the test of time and it better because I live Georgia and I have a black car now, heat is a killer of any electronics. Luckily the DRS2 utilizes supercapacitors instead of a typical battery which means it can handle extreme heat and cold way better and for longer than most batteries fitted to this kind of device.

Taking a look around, on the left side you have the slot for the micro-SD card, which supports cards up to 128gigga bytes, you also have the microphone, and a reset button. On the bottom or top whichever way you want to look at it is the 2 inch LCD screen and the accompanying buttons below which all perform certain functions that we’ll review after installation. The buttons themselves have a great tactile feedback, just adding to the overall quality. On the right side behind the second camera is the mini-B USB port for power and a port to hook up your compatible GPS antenna like the Aukey GM32.

Of course, you buy a dashcam for its camera or cameras in this case, both of these cameras use the Sony Exmor IMX323 CMOS sensor, they both record in 1080p at 30fps with the option to record at 720p at 30fps or 60fps, the front camera has a 170-degree field of view, the rear 152 degrees, altogether you get 322 degrees of coverage. The second camera also has 2 built-in Inferred LED lights to improve vision in dark settings; a smart technical decision by Aukey who had the foresight to know the second camera was going to be in dark scenarios the most.

Both cameras can be rotated across their Y-axis to make sure you have the best view at all the time. The front camera can rotate 90 degrees from its original position locking in at roughly 15-degree increments, this much rotation allows it to accommodate even extremely angled windshield. The second camera can rotate even more at about 135 degrees, its motion is a bit smoother so you have even more control of the view once installed.

SONY Exmor

IMX323 CMOS Sensor

  • 1080p at 30 FPS
  • 720p at 60 FPS
  • 720p at 30 FPS

Field of view

  • Front camera 170 degrees
  • Rear camera 152 degrees

Here is where things get interesting and I think is this dashcam’s defining feature, this second camera is — detachable. That’s right, with just a little pull you can pop it right off the main body. Now you see where those extra cables and mounts come into the play. This is such a simple implementation that takes this dash cam to the next level. Whether you detach the camera and mount it somewhere else or leave it place you still have a tonne of flexibility. I used that flexibility to create my own setup that some of you may be interested in.

Installation

Installing the Aukey is a fairly straight forward process but there are some details that may not be familiar if you’ve haven’t installed a piece of equipment like this in a car before.

  1. Optional – Replace gray tape
    • This step is optional but the first thing I’m going to do is replace the gray 3M tape with the same VHB double sided 3M tape but in black on both the dashcam mounts and the cable loops. Previous experience tells me that the gray tape sticks out like a sore thumb so I’ll go ahead and swap it out now. Link to the 3M roll I used will be below.
  2. Insert SD Card
      • Next, insert your micro-SD card by sliding into the SD slot with the contacts facing down toward the screen. The locking mechanism is spring-loaded so you’ll hear a little click when it’s in place. To remove it you push inward on the card to release the spring and it will pop out.
          • I’m using a Samsung 128gb EVO Select Class 10 UHC Speed Class 3 card. These cards are great and for only $17 you can’t go wrong. A link to the card on Amazon will be below.
  3. Prep the Area
      • Just as in any installation you want to clean the surface where the camera will be mounted and make sure it’s dry.
  4. Prep the dashcam
      • Next, I chose to go ahead and attach the mount to the camera. It makes it easier to properly align the whole camera when adhering it in place as opposed to just trying to place the mount on its own. I also removed the second camera so everything looks balanced.
  5. Mount the dashcam
      • Remove the adhesive backing and carefully attach the camera and mount to the windshield while trying to keep it level. I placed mine a little below the rearview mirror mount so that it’s out of sight while I drive. Of course, you can put it lower, or in a corner, or where ever suits your fancy. Of course, if you plan on leaving the second camera attached just make sure it has a view into the cabin.
  6. Plugin power cable
      • Now the fun part, running the power cable. Go ahead and plug the cable into the camera.
  7. Run power cable in headliner
      • Depending on the make and model of your car this part may be easy or difficult. In my car, a 2017 Honda Fit, I can easily tuck the cable over/under the edge of the headliner running across the passenger side of the windshield completely concealed. In some cars you may need the trim to remove tools to open a gap to slide the cable in, just remember to be gentle.
  8. Run power cable down A-pillar
      • Bringing the cable back down was a little weird because of the peculiar design of the A-pillar in the Fit. I had to use 3 cable loops to first fasten the cable in the corner of the windshield, than a little further down and lastly in the corner of this smaller window. The provided cable loops are easy to use, just place the cable between the loop and press down on the tab until it snaps in place then stick it.
  9. Run cable behind the glove box
      • You’ll probably want to empty your glove box before this next part. To access the space behind the glove box all you have to do, for most cars on the market, is to simply push the side panels of the glove box inward until the stoppers can slip by the frame, which than allows the entire glove box to flip all the down giving you access to all the space behind it.
  10. Feed power cable behind glove box
      • Next we want to drop the cable down and go underneath the dash. On the Fit there is a perfect access hole between the glove box and the side of the dash. We can loop the cable through here and behind the glove box.
  11. Bring cable forward
    • Now you can feed the cable behind the dash to another gap in the panel between the center console and the glove box compartment. Now, bring enough cable to plug into your nearest outlet.
  12. Plugin power adapter
      • Plugin the car power adapter then the power cable.
  13. Tidy up cable
    • With both ends connected it’s time to organize the slack left in the power cable. Luckily for me all I have to do is bundle up the cable, tie it off, and pack it into the same access way on the right side of the glove box.
  14. Done – almost
      • If you don’t plan on detaching the second camera you call the installation done.
  15. Second camera placement
      • For me though, since I put the dashcam behind the rearview mirror I had to find another place for the second camera. I decided that I wanted an interior view so I mount the second camera above my rearview mirror. Technically I put it upside down but this was on purpose because I wanted the cable to come out the right side and I can flip the video when I need to.

I feel that having an interior view of your car is a good idea because you simply don’t know what can happen, especially for those of us who rideshare, it can protect the drivers and the passengers, I don’t understand why it’s not mandatory. It also suits my car well because I have a great view out of the back thanks to the inherent benefits of a hatchback. This may not be true for everyone.

3M VHB double sites tape adhesive
Samsung EVO Select micro-SD card

Secondary Camera

Of course, many people will opt to put the second camera on the back window to get a view of everything behind the vehicle. You’ll just have to run the power cable to the back. The important thing to remember about running any from the front to the back is to run it low, putting it under the door kick plates and side trims. You don’t want to try and tuck in the header liner on the side because most modern cars have side airbags that deploy from above the headliner, don’t even try please. Anyway the trim removal tool will make this process a lot easier. Tuck your cable underneath the trim pieces and then run them up the C-pillar to the back window. As long come down from the middle of the headliner you should be good to open a close the trunk if you have a hatchback like me.

To mount the second camera slide the camera into one of the cylinder-shaped mounts lining up the two pegs and the connector to the three holes on the inside of the mount, the USB connector can only be slotted in one way. You should hear a snap when you push them together letting you know they are secure. Now run your cable line, plugging in the male end of the cable to where the camera used to be on the dashcam since I only really needed like 7 inches of cable I tucked the rest of it in the front of my headliner, not pretty but no one will be the wiser. I do wish they didn’t use a proprietary cable so that I could have bought a shorter run for this setup. Oh well.

Hold the mount and camera as you plug in the cable. The cable will also snap into a little dimple of the USB connector of the camera, this sandwiches everything together.

running a cable from back to front
AUKEY DRS2 Dual Camera Dashcam second camera mount

Finally, with everything in place, we can appreciate a few things like the mounting system. It’s really simple but immensely effective. Unlike the suction cup solutions employed by other dash cams, this mount will not move when you hit a pothole or slowly drift out of position from everyday driving. The way I mounted it all you see is the second camera, the primary body is hidden away and even though that gray still sticks out it’s not too bad since it’s pretty small.

Dashcam Initialization

Now it’s time to power it up. Turning on the car will automatically power up the camera. On initial setup, the first screen asks for you to choose a language and then enter the date and time. Also if you didn’t format the micro SD card like I forgot to do you will be prompted to do so, which only took seconds to complete.

Even though the screen is only 2 inches big the text and menu icons are sharp and crisp which makes it easy to browse through all the settings and confirm the resolution, loop timing, etc. The menu layout and button configuration makes navigating everything easy and intuitive. The first button takes you to the previous menu, the up and down arrow buttons do what you expect, and the OK button preforms an Enter or Confirm function. You can hit the back button until you leave the menu or let it idle out.

When you’re not in the menu system each button performs different actions. The first button is an Emergency recording button when pressed the current recording will be put into a separate folder protected from being overwritten. If the Up button is pushed and held it will turn on and off the audio recording, you’ll see a little microphone icon in the top right of the screen. If the Down button is pushed and held a screenshot of the current view will be taken. If it’s just tapped it opens the menu.  Pressing the OK button will switch the display on the screen between the three available views.

The DRS2 also has a motion detection feature for when your car is parked, but this requires continuous power to the dashcam which most cars do not provide when turned off. There are a couple of solutions like using a power bank or Aukey’s own OBD 2 adapter kit model PM-YY. I’ll be reviewing the PM-YY in another video because there’s a lot more to go over than you would initially think.

AUKEY DRS2 Dual Camera Dashcam mount
AUKEY DRS2 Dual Camera Dashcam screen

Footage Review

When it’s time to download footage I find that it’s easier and faster to pop out the SD card and connect it to another device. There’s a couple of ways to go about doing this but you’ll need an SD card rear no matter what. For my PC I’ve been using this Transcend USB 3.0 multi-card reader. I’ve also been playing around with this Anker type-C card reader that can be hooked up directly to a compatible smartphone to view and share clips without the need for a computer or laptop. Links to both readers below.

Finally, it’s time to see some footage and make a final judgment. When reviewing the video files both the front and rear camera footage is saved in the same folder in alternating clips. Right away you can see the video processing is definitely aggressive with the sharpening but not so bad that it’s detrimental. Now the second camera also is aggressively sharpened but also as you can see the color is a little off to say the list, I thought it was hilarious. These funny colors are due to the inferred LEDs on the second camera. I ended up switching the color mode to black and white and was happy with results especially in dark situations.

AUKEY DRS2 Dual Camera Dashcam footage
AUKEY DRS2 Dual Camera Dashcam interior footage

DRS2 User Manual - PDF

User manual with all of the technical details and instructions for the proper use and maintenance. Includes six languages, English, Dutch, French, Spanish, and Mandarin.

Conclusion

Even with those small niggles, the video quality is superb; you can read signs and license plates without a problem day, night, and everything in between. The viewing angles give you so much to work with, I love it. Here is an assortment of footage in some different conditions.

Now the $150 price tags is a bit steep if you’re looking for a bog-standard dashcam but I think it’s a great value for what you get, two true 1080p cameras, great build quality, innovative design, and a 2-year warranty. It’s hard to find a good quality competitor in the same space. The link to the dashcam on Amazon will be below.

Special thanks to AUKEY to for sending me the dashcam to check out!

Share the knowledge!

Facebook
LinkedIn
Twitter
Reddit

This website uses cookies to ensure you get the best experience on our website.