Intro
Hey everyone, Patrik CK here, with a web development tutorial. This one is all about creating custom icons to use on your WordPress website utilizing the Elementor Pro page builder.
There are three parts to this tutorial.
- First, we’ll cover how to build your custom icon so that when you export them they are optimized for the converter on the Fontello website. I don’t know why but this part seems to be missing from all the tutorials I’ve watched about this topic so I wanted to make sure it gets covered here.
- Second, we’ll use the Fontello site to convert our new icons into a font family that can be used on any website regardless of the underlying technology.
- Third, we’ll upload the newly generated files to our WordPress website using the Custom Icon feature in Elementor Pro and see our new icons in action.

Full Review
Watch the overview video or keep reading the full article below
Table of Contents
Why Go Through This Process?
Before we start I want to answer the question of why we need to go through this process when the free version Elementor allows you to upload SVGs into any of the widgets that support icons. The simple answer is that you don’t have to, you could create your custom icons and upload them directly to your site as an SVG file with no problem but if you wanted to say, have your icon change color when hovered over, or be available in the icon library in the future without having to search for it in the media library, or create a stacked and white version, it’s much easier to have these capabilities when your custom icons are converted to font files.
For me, the biggest advantage is the ability to change the color on the fly. Instead of making different colored versions of the same icon you only need one that can then be changed into any color with the Elementor settings or simple CSS if you’re not in WordPress. It’s so much more convenient and easier to maintain going forward. I’ve also found some quarks with particular widgets when using uploaded SVGs as icons. Such as sizes not being consistent between the editor and the live page, colors being overwritten, or any number of other issues that have cropped up over the years, I’m guessing from compatibility issues with other plugins.
Get Elementor Pro
You will need to buy an Elementor Pro license to use the custom icon library on WordPress. Visit Elementor’s site to get more details on the Pro plan and pick up a license of your own. You won’t regret it!
Creating Your Icons in Illustrator
Let’s get started. I’m going to be using Adobe Illustrator to create the custom icons and while the commands may be different the logic behind how to build the icon should work no matter the program you use as long as it supports SVGs, so no MS Paint.
Even though we are working with vector graphics it’s still a good idea to start with a larger canvas such as 1000 pixels by 1000 pixels. Working on larger canvases simply allows the scaling of intricate details to be easier to calculate.
The most important thing to remember when making your custom icon is to not have multiple infilled elements stacked on top of each unless they are contributing to the overall shape. The best way to see this for yourself is to simply fill all your elements in with one color such as black. This way you see if anything is filling a space it shouldn’t and delete it or cut it out. This is especially true if you are trying to create icons with a background like roundels. You can not simply put your custom icon on top of a circle, you’ll have to cut it out of the circle itself.
Compound Path Function
The easiest way to do this and get your icon ready for export is to use the Compound Path option under the Object menu in Illustrator. As the name implies this function combines multiple paths into one and in the process paths are removed and cut. Let’s see a few examples of how this works. Let’s make a circle than a square. If we put the square on top of the circle, select them both and go to the Object menu, then down to Compound Path, and select Make or use the shortcut CTRL and 8. We see that now the square was cut out of the circle essentially flattening our graphic. If we undo Compound Path and move the square so that it’s hanging over the edge and preform the function again we see only the part of the square that’s on top of the circle gets cut while the rest of it that’s outside of the circle remains, again we see now that it’s just one path and not two different elements stacked on top of each other.
Here is where things get interesting. If we reset our example graphic and now add a triangle into the mix, putting it to overlap part of the square and now make our compound path we see how adding more elements affects the results. If there are three or more elements on top of each other whatever outline they make will remain when the compound path is made. This can allow you to make some intricate layouts. Something I would definitely recommend playing around with. I’m using basic shapes for demonstration purposes but the same ideas apply to anything you want to create a compound path with, so have at it!
Three element compound path result for a roundal
Multiple element compound path result for a roundal
Export Your SVG
Let’s get ready to export! No matter what your icon looks like you need to Make a Compound Path so that what you have left is a single element. Also, ensure there are no outlines and that the fill is a solid color with no gradients. Select your icon, right-click, and choose Export Selection. In the export window choose where you want to save to and most importantly under formats, select SVG, lastly choose Export Asset.
If you’re not using Illustrator the same rules still apply, the final SVG file should only consist of one path, with a solid fill, and no outlines.
For you more technical folks the SVG code should look like this. With only one path, no predefined polygon attributes, or the like. Clean and simple.
					<?xml version="1.0" encoding="UTF-8"?>
<svg id="Layer_2" xmlns="http://www.w3.org/2000/svg" viewBox="0 0 641.11 641.11">
    <defs>
        <style>.cls-1{fill:#231f20;}</style>
        </defs>
        <g id="Layer_1-2">
            <path class="cls-1" d="M320.56,0c177.04,0,320.56,143.52,320.56,320.56s-143.52,320.56-320.56,320.56S0,497.59,0,320.56,143.52,0,320.56,0ZM133.33,507.78H507.78V133.33H133.33V507.78ZM32.22,374.44H374.44V32.22L32.22,374.44Z"/>
        </g>
</svg>
Convert Icons into Webfont with Fontello
Now that we have our SVG file or files let’s visit the Fontello site at fontello.com. Fontello other than being a great library of already-made icons is also an SVG to Webfont converter. Webfont also known as Web Open Font Format or WOFF for short is a format for supporting fonts on modern browsers which provides the ability for vector scaling and colorizing. We are essentially turning our icons in a font that a browser can read and render. There are other online converters like IcoMoon, Fontastic, and more that all essentially do that same thing. I’ve just always used Fontello.
The converter is very easy to use. Simply drag and drop your SVG files onto the page. Once all your icons are uploaded they will appear under the Custom Icons header. If all you get is a square outline, something was wrong with your SVG file. Open the file again in the program you used to create it and make sure the requirements mentioned above were followed. When I first started messing around with icons not performing the Compound Path function was what kept messing me up.
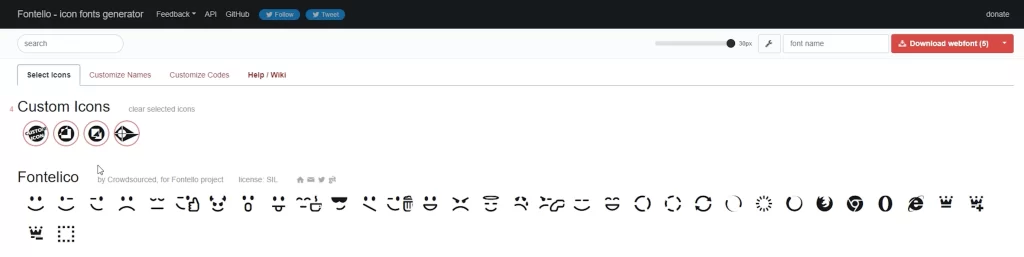
With your successful icons uploaded, you can click on each one to get a preview and provide additional details like the name, hex code, and keywords. If you are working on a lot of icons it’s best to create a good naming convention for all of them.
When you have all your icons uploaded and details added make sure they are all selected along with any other icons on the site you may want and go to the top right and give your font a name. Be descriptive but succinct so that you and other users of your font icons know what to expect. This name can only consist of lowercase letters, dashes, and underscores Then hit Download Webfont. The number in the button identifies how many icons are part of the font, so make sure this matches your own count.
Upload Webfont to WordPress with Elementor Pro
The zip folder you get contains several files that should fit most project needs. For this tutorial, we’ll be uploading the entire zip file to Elementor Pro. To do, this log into your WordPress site. Under the Elementor menu go to Custom Icons and then Add New. In the next screen type in a name for your icon set, this is the name that will appear when you pull up the icon library. Again just be descriptive but succinct. Now drop in the zipped file we downloaded from Fontello.
After a successful upload, you should see your icons appear on the screen where you can now publish them
One drawback to this setup is the inability to add icons to an existing set you’ve already uploaded. This is more of a technical issue with how font files are handled than a miss on Elementor’s part but I still wouldn’t mind seeing a system where we can add more icons without either reuploading the entire font family or adding a whole other font family for one icon which adds more requests onto the page load which is bad.
So like with any project make sure you plan out your needs ahead of time so that you have all the icons you need in one set.
Anyways, let’s see our new icons in action! Load up the editor and pop in a widget that supports icons. In the icon library, any icon set you’ve uploaded will appear below the stock libraries and be titled with whatever name you gave during the creation process.
Select one and load it onto the page. You can change the color, make it larger, swap it for one of the other icons, or do anything you want. Well, that’s it, we have our custom icons on the site ready to use anywhere.