Elementor
Initial Release in December 2016

Beaver Builder
Initial Release in March 2014
Intro
During my time in the realm of website development I’ve moved from one platform to the next starting with straight HTML writing in a Notepad (still do sometimes), quickly moving to Microsoft FrontLine to generate HTML and CSS, rather poorly, then moved on to Adobe Dreamweaver which also generated HTML and CSS still pretty poorly. Then came the world of direct on-line editing with WordPress and the idea of using a CMS based on PHP to create and maintain websites. Of course, anyone who uses WordPress knows there’s a whole other world of tools that can be used to build sites with the WordPress platform. Between countless themes, frameworks, page-builders, plugins, etc no one really knew where to start, so you kind of just picked something and if it works you stuck with it until the next better thing comes around.
I started with Be Theme as my intro theme and used what was known at the time as Visual Composer for the page builder. Be Theme is a versatile theme with a ton of built-in options and it included Visual Composer out of the box. The theme also received updates weekly which sounded fantastic, at the time! For a time is was good and Visual Composer was a decent block by block builder. I accepted that editing theme PHP template files was the only real way to add custom pieces to the header, footer, archives, etc, since you only had so many layout options provided by the theme. After a couple of years of working with this combination, I hoped some better solution was out there. So I started looking and low and behold Beaver Builder was there for me. First released in late 2014 it’s grown in leaps and bounds since.
The fact that it’s a front-end the only editor was amazing at the time, no more going from the back to the front end for every little change until you get what you wanted. Beaver Builder’s Themer, ie, theme builder, made creating headers, footers, global rows, archives, 404s, etc so much easier since it’s all using Beaver Builder’s page builder interface, no more being stuff with stock theme layouts. Not to mention Its ACF (Advanced Customer Fields plugin) integration took the possibility of working with custom content and display dynamic data to another level without the need to write any PHP code.
As with any piece of software, there’s always room for improvement and this is where Elementor comes in. First Introduced in late 2016 it has grown into a phenomenon and well deserved. Now the jump from Beaver Builder to Elementor wasn’t as drastic as say going from Visual Composer to Beaver Builder because both Elementor and Beaver Builder have some very interesting features. Each of which can make choosing one over the other difficult and highly dependent on their needs. That point is what this article is all about. I’m going to try to take an in-depth look at both platforms from the basic stuff down to the nitty-gritty details but I’ll try to summarize the main points when I can.
Full Overview
Table of Contents
Personal Considerations
Obviously I’m a little partial to Beaver Builder, I’m not going to make any qualms about that but I like to think of myself as someone who is good a looking at both sides of a question and dispassionately coming to a conclusion. So I will try and do my best to be impartial and I ask that you as the reader do the same. I know we creative and technical types like to sit in our camps and will fight for them to the determent of both sides. All that being said I’m a techy so I will be coming from a little more of a technical perspective but I can be creative in short bursts so again I’ll try to cover both platforms from both of these angles as equally as possible.
Pricing
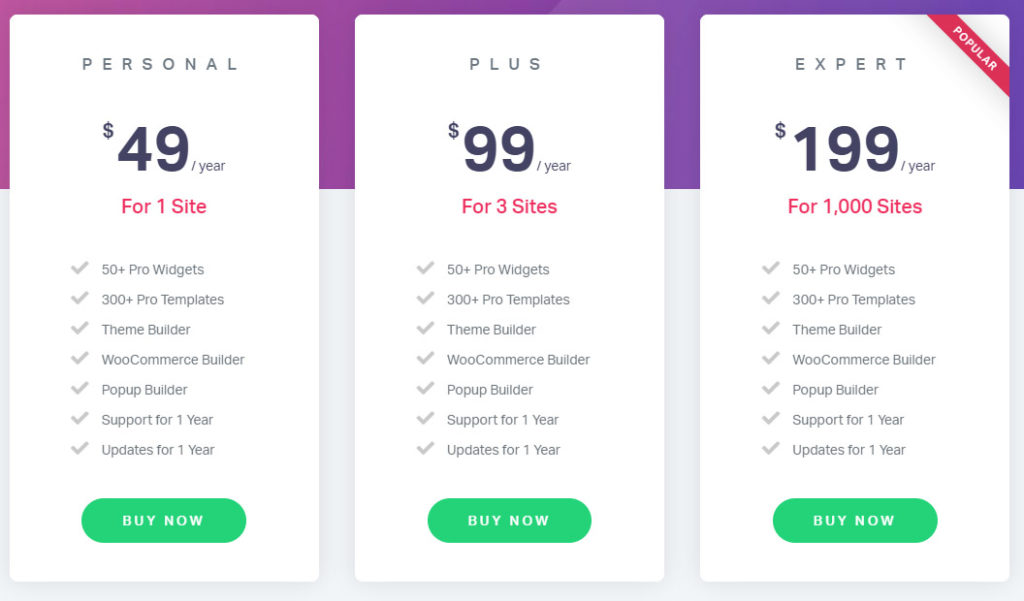
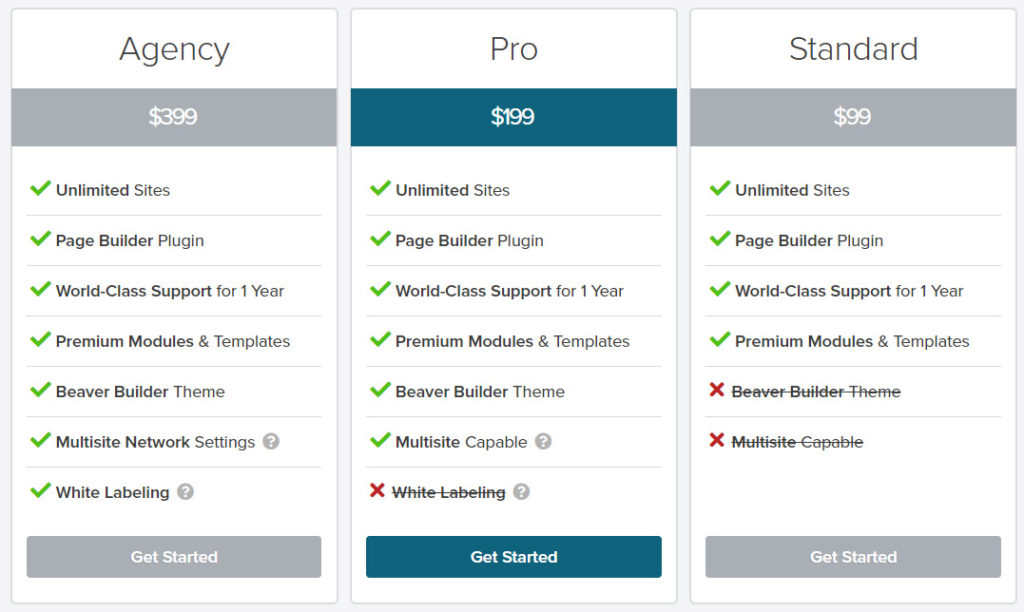
Right at the onset from other articles I’ve read and from taking part in the social communities on both sides, there seems to be consciences that Elementor is slightly more for Designers and Beaver Builder is slightly more for Developers and looking at their respective pricing structure there may be some credence to this. While Elementor’s cheapest offering starts at $49, it is intended for a single site, basically personal use. While Beaver Builder’s cheapest package is $99 but has unlimited site licenses. This is in contrast to Elementor whose Expert package for $199 is good for 1,000 sites but we can agree that this is basically unlimited. Again though the fact that Beaver Builder offers unlimited site licenses with their cheapest package hints to a platform intended for a development shop as opposed to an individual looking to build one site. One major difference is that even Elementor’s Personal license comes with their Theme Builder and epic popup builder.
Plugin Setup
For Elementor Pro users you’ll need the free base Elementor plugin and a separate Elementor plugin to enable the Pro features. For Beaver Builder Pro you’ll need the Pro plugin installed and a separate plugin for the theme builder. So whichever you choose you’ll be ready to go with just two plugins. Now that Elementor has its own theme you can keep a tightly integrated ecosystem where everything is supported directly from their respective developers.
Lingo
Before I dive into the details just a quick primer on the differences between the lingo of both builders. For instance, a Section in Elementor is the same as a Row in Beaver Builder. Columns are the same for both, but in Elementor individual building elements are called Widgets while in Beaver Builder they are called Modules.
The stand out features of Elementor for me
I want to talk about the most important aspects early on because as you’ll see these key features define both platforms and can make or break your choice. Beyond the unique settings of individual widgets and quality of life features, that I will go into later, there are three systems of Elementor that stand out above any other platform I’ve encountered. This includes the Motion Effects options, the advanced Positioning options, and the Popup creator. As you see these are primarily on the front-end of the equation. As you read more you’ll see how this contrasts with Beaver Builder.
Motion Effects
Almost every section, column, and widget has Motion Effects and every widget also has Positioning options in their advanced tab.
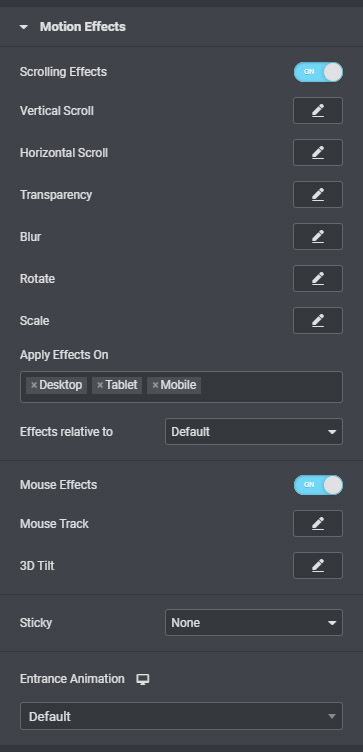
Motion Effects does just as it sounds. It offers tones of options like Scrolling Effects which allows you to animate half a dozen attributes based on the distance the user has scrolled. These attributes include vertical scroll, horizontal scroll, transparency, blur, rotate, and scale. If you combine any number of these animations you can create some amazing visuals. The settings for each attribute provides immense control of how much of the animation is complete based on how far the user has gone from the top and bottom of the section. This kind of control is impressive, to say the least.
The next Motion Effect section consists of the Mouse Effects which includes two properties that are specific to the user’s mouse movements. The Mouse Track option enables a widget to track with the mouse in either direction. The 3D Tilt option does as it sounds, it basically follows the user’s mouse to tilt the widget in 3D space, pretty fun effect.
Next up is the Sticky option. This will fix the widget to the top or bottom of the page or column once the user scrolls past it. A simple but useful setting.
Lastly, you have the full animate.js library for entrance animations. Nice quality of life piece here is the search box. If you already know exactly which animation you want it’s a quick way to bring it front and center.
If you tie all these Motion Effects options together you can get some really intricate and fun animations for every section, column, and widget.
Positioning
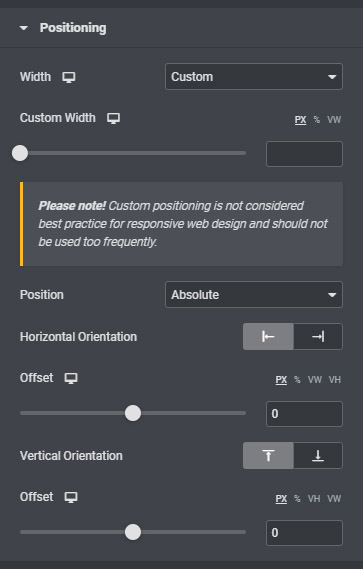
This section actually blew my mind when I first played around with it. The first option Width is pretty straight forward, you can manually control the width of the widget so that it can be narrower without affecting neighboring columns, this setting is useful in conjunction with the next option ‘Position’ of course by default widgets sit inline based on where they lay on the grid but you can choose from two options that I find amazing.
First is the Absolute positioning option, it does just as it sounds. Basically, when you choose absolute you gain complete control over the module’s position. You can literally drag that widget anywhere on the screen, this is their pixel-perfect gain to fame. It’s amazing that you can do it so easily. Trying to write CSS to do that would be a right nightmare. It’s still not exactly best practice to use this option but it can be extremely helpful and since you can control the positioning based on breakpoints your responsive layout should not be adversely affected by it.
Aside from Absolute, there is also the Fixed option. Again this does exactly what it sounds like, it fixes the position of the module to the window with the added ability to put it exactly where you want. This puts the widget front and center for the user no matter where they go on the page.
Popup Creator
The Popup Creator is a powerful system built into Elementor and very unique in its UI and options. You have access to all the widgets in the popup builder along with all the aforementioned animation and positioning options.
A feature that I like is while you are in the Popup Creator system certain widgets do specific functions related to the popup setup. For instance, a button widget can be tied directly to the closing function of the popup. This makes creating consent or multi-option popups easy.
The popup settings include many options to make the UX as smooth as possible for the user while still implementing your goals. For instance, the option to avoid multiple popups is great if you have more than one popup that can be triggered on the site. If you may have a popup triggered by a button and one triggered by the time-on-page. If the user is quick to hit the button, the timed popup can interfere with the other. This option alleviates that worry.
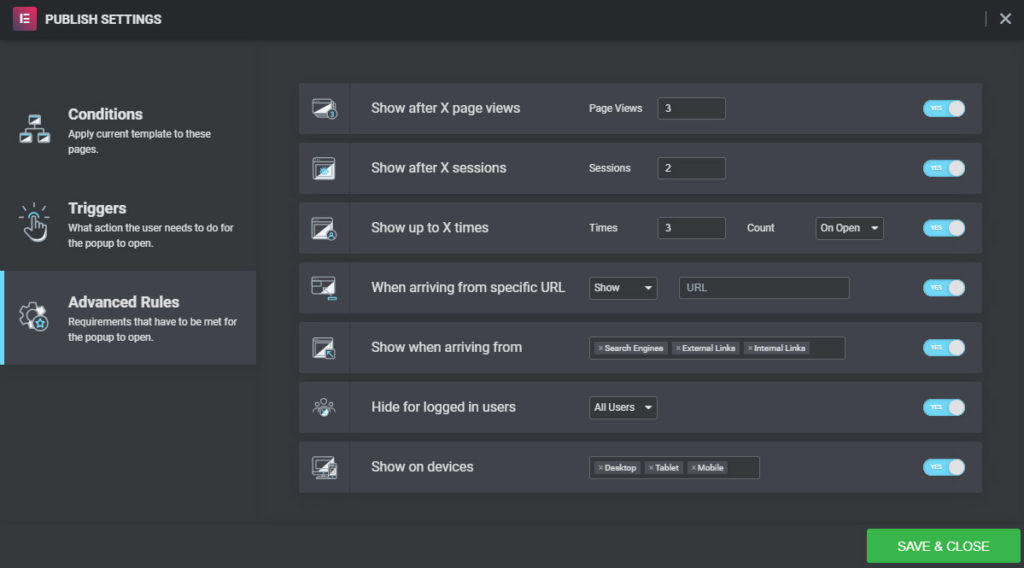
The number of Publish/Trigger settings is amazing, it’s broken up into three sections. Conditions, simply tells where the popups will be displayed. The condition options are very flexible to the point where you can choose to show a popup on all posts with a specific category except for 2 that you choose.
The next section are all the Triggers, what’s nice is that you can have multiple triggers, all triggers, or just one. Besides the standard, On-Page Load (time on page) and On Click, there are also On Scroll to Element where you can choose to trigger the popup when the user gets to a specific element on the page. You can also set to show after the user has scrolled a certain distance down or up the page. Lastly, lastly you have On-Page Exit Intent and After Inactivity. A great selection of Triggers, but wait, there’s more.
The stand out features of Beaver Builder for me
Again beyond the unique settings of individual modules there are three pieces of Beaver Builder that standout to me, advanced Themer options, advanced ACF integration, and custom post loop layout. As you can guess these three are on the more technical back-end side on the equation.
Themer Options
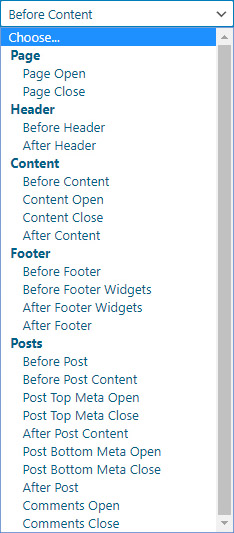
Beaver Builder’s Theme Builder is called Themer and does the same function as Elementor’s Theme Builder. You can create headers, footer, archive, singular, and 404 templates and choose where to show them based on a number of rules. One unique feature of Themer though is the ‘Part’ layout. Unlike headers and footers that have their given positions a Part can be placed in any number of places on the page. For instance, you can position it before the content, or before the comment section, or above the footer, or even above the header.
The Part option can be served in several different ways such as a standard blog post-sub-header, or a global CTA, author boxes, etc and with the same flexible display rules to automatically show your parts exactly where you want it. This is different from creating a post/page template because you still have the option to use the page builder on individual pages without affecting or overwriting the part.
You can see this in action on this entire site. Specifically, the sub-header at the top of this page which automatically and dynamically populates with the post title and the featured image using the field connections system which is similar to the dynamic data system in Elemetnor. Since this is a Themer Part the settings, like the height, gradient background, etc. are identical and if I want to change the color gradient I only have to do it once and it’s updated sitewide.
Other than the Part, Themer includes many more advanced Location options such as the ability to show Themer layouts on specific Page Ancestors. This allows Themer layouts to show up on all pages that are children to a specific page which allows for more flexibility with location rules.
ACF Integration
For the uninitiated ACF or Advanced Custom Field is a plugin that allows you to add well, custom fields, anywhere on the back end of a site and then display that the information from those fields anywhere on the front end. Using those fields allows for a wide array of setups where all the user/client has to do is fill out the fields. That information is when dynamically display on the page based on a template. This avoids the worry that a client will utterly break your hard work. This also makes maintenance much easy as you only have to edit the template and not every single page individually. Originally you had to create these template files by writing PHP code to display the information which can be cumbersome. Luckily Elementor and Beaver Builder can take these custom fields and display them without the need to write PHP code.
While Elementor has really good integration with the ACF plugin Beaver Builder takes that integration to the next level. Not only can you connect and show content saved to custom fields you may also use logic to programmatically show almost anything you want without modifying template files, because you can write the logic directly in the page builder using special shortcodes.
For instance, you can build a basic if-else statement using the following shortcode structure
    //wpbb-if post:acf type='radio' name='valriableName' exp='equals' value='yes']

                // DO SOMETHING HERE

                [wpbb-else]

                // DO THE OTHER THING

    //wpbb-if]
Beaver Builder also provides shortcodes to perform loops and connect to repeater fields and more. It’s a very flexible setup that introduced a lot of possibilities for automated layouts based on user input, which will come in handy in the next section. As I mentioned, in the beginning, this is a very technical system that requires some basic knowledge about programming language logic, which I’m pretty familiar with but I know many people are not. This plays into the original notion that Beaver Builder was meant for developers. None the less I really enjoy playing around with different ways to incorporate this feature.
Custom Post Layout
Everyone is familiar with the basic post loop layout, you have your featured image, post title, metadata, maybe the excerpt or intro content, and a read more button or link. Usually, you arrange or show these elements in different ways, but what if you wanted to add something custom that’s not part of the traditional options? Or create a custom post type for employees and display their phone number and a link to their Linked page and to their bio right in the post loop? This is where the custom post layout plays an amazing role and is my favorite feature of Beaver Builder. Combined with the advanced ACF integration mentioned earlier and you can build basically any loop with any content in any layout you want.
Using the same shortcodes provided by Beaver Builder you can pull in any piece of data from each page, post, or custom post type to include in the loop, you can even use that same programmatic approach to show content based on custom field inputs. Which then makes maintaining and adding new anything really straight forward for you and your clients.
This is a pretty abstract concept if you’ve never done something like this before. Luckily I’ve used this feature on this site in several places not only for posts that leads the user to more content but also for listing content on their own that don’t necessarily lead to other content because all the information can be displayed in the loop itself. The best place on my site to see this in action is in my articles about the best Beaver Builder extension plugin. Each item I list in that article is an individual custom post type I called ‘Modules’. To add a new item I simply create a new ‘Module’ enter some data into the custom fields and the logic for which icon to show and where each piece of data going is automatically populated onto the article in alphabetical order. Simple yet highly effective.
You can also see a simpler demonstration on the Trusted Brands page. Again a custom post type called ‘Brands’ some custom CSS and you have a wonderful way to show off information with a little flare that is easy to update in the future.
While there is some manual ‘coding’ to set everything up once it’s done you have what you need to keep it up to date. It also makes modifying the layout much easier than trying to update a bunch of individual modules.
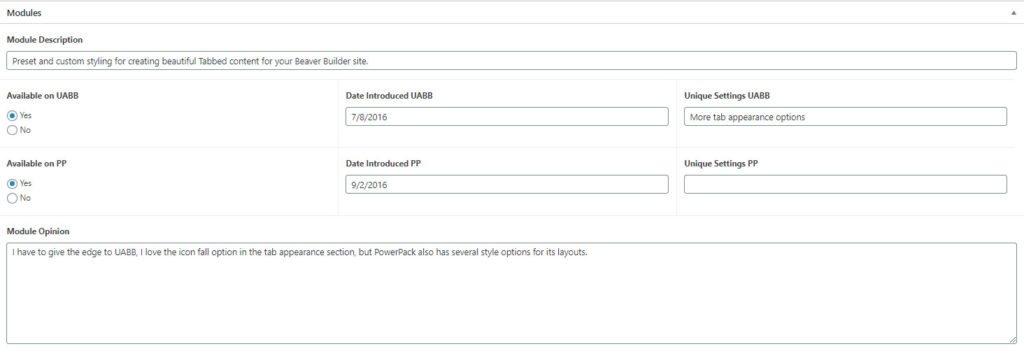
These are the fields I fill out for each module. All that information automatically gets populated into the loop on the article. I could also use this information to create individual pages with a template. As you can see you can create a very efficient data entry screen for users to fill out and allow the template to do all the hard work.
Quality of Life
These are those little things that just make it a little easier on you and your work. A lot of time I just stumble across these features and think to myself “Oh, that’s nice”. Each item I mention is unique to their respective platforms.
For Elementor
- You can add the ability to use the page builder within page/post templates
- Native SVG upload support
- Ability to upload any SVG in place of choosing from the icon library
- Ability to rotate icons in Icon widget
- Icon library easier to navigate, all icons have their names below
- Color library and color picker in one screen
- Separate your content into columns in the text editor widget that can be controlled based on breakpoints. Column Gap is also controlled here.
- Right click functionality to quickly preform certain tasks like duplicating content, copying styles, and deleting widgets.
- Global light box settings
- Columns are equal height by default and you can vertical align each individually
- Navigator window displays all the elements on the page in a hierarchy so you can easily navigate to a specific row or widget. Comes in really helpful if you have fixed or sticky elements throughout your page. Keeps everything nicely organized.
For Beaver Builder
- Ability to move Beaver Builder interface from left to right or free float
- Scroll to load more pagination option
- Can save any level of element for later use
- Ability to create a new column by dropping a module next to an existing module, not really sure why you can’t do this in Elementor.
- Ability to add custom JQuery or JavaScript to individual pages alongside custom CSS
- Included WordPress dashicons in icon library
- Ability to load saved rows/columns/modules into other modules without the use of a shortcode.
- A number of standardized shortcodes like 2020 which is used to show the current year, ideal for copyright years in the footer. It also comes with a number of parameters you choose from to display the current date.
- You can copy the settings of any modules, column, or row in the advanced screen. While Elementor can do this too but since this section provides you a string of data you can not only paste the settings on any page you are working on you can also paste it on any site that is running Beaver Builder 2.8.1 of higher.
Those are the highlights but each platform has a ton of widgets/modules and even more if you purchase extension plugins like Ultimate Addons for Elementor or PowerPack for BeaverBuilder which both add another 70+ building elements and other enhancements.
Speed
I ran two different speed tests for each builder. First I ran speed tests on a fresh install. Only the respective themes and the plugins directly needed to build a site and nothing else, plus a blank homepage. I then ran the test after building out a page. I build similar homepages on both again with only the base page builder plugins. Below are the results I ran on my server using Pingdom’s site speed test with the test server in Washington DC. I ran each test five times and took the average for each.
There’s a slight advantage for Elementor when you start a completely fresh site with Elementor loading in at an average of 400 milliseconds and 18 resources compared to the average of 650 milliseconds with 17 resources. When adding content to a page they actually are neck and neck with both averaging 1.03 seconds with identical page sizes and weirdly both loading in 58 resources.




Can you integrate both?
By now if you’re like me you may be a little disappointed. I wanted to go into this article and find a clear winner, one that can tick all the boxes and that would be that. Obviously, as you can see it’s not so clear cut. Yes you can choose one based on the needs of your site. If your site uses custom post types and a lot of ACF content go for Beaver Builder if you only need front-end flash go for Elementor. But again if you’re like me you’d be pretty annoyed that you can’t have custom post layouts and an amazing popup builder. It was actually annoying me to no end once I played around with the Popup building in Elementor. I told myself I want this, but I need custom post layouts and the Part section of Themer so I did some testing to see how well both plugins could play together.
It took some doing, trying different combinations of which theme to use, which theme builder to use, how to use one-page builder in another but I think I’ve come across how to integrate both together to benefit from their unique features. I will say this right now, this isn’t strictly practical for most people especially if you’re on a budget because you’ll be paying for two page builders but if you’re a website shop or an agency who builds many sites a year the benefit of having both in the long run pays for themselves and someday if one platform manages to incorporate everything the other is missing you can always consolidate.
So here is what I found worked for me and seemed to be the most stable approach with took advantage of both platforms to their fullest. Again I will say this is a weird setup but it works for me. So the theme is Beaver Builder, you have both Elementor and Beaver Builder page builders, the pro versions installed for each. Basically for the header and footer use Beaver Builder’s Themer because this is the only way for the Part option to work. If you use Elementor’s Theme Builder the Part will not work. For the page content use Elementor. On any pages where you need to use custom post layouts build in Beaver Builder. I know this sounds a bit weird even crazy of a setup this is how you can take advantage of everything, Motion Effects, Positioning, the Popup Builder, Themer Parts, advanced ACF integration, and Custom Post Layouts, plus all the other little things that both platforms offer, without actually messing with page load speeds.
I found that it didn’t load a whole lot more extra resources. I honestly expected it would load everything from both leading to hundreds of resources but actually it came out a lot less. A page that had Beaver Builder headers and footers and Elementor page content only loaded in 62 resources with no impact on load time.
There are a few small caveats. I find you have to manually find the page/post title using CSS because the option to hide the page title does not work in Elementor. If you open a page with Beaver Builder that has Elementor content the styling will be overwritten by Beaver Builder but if you open the page up again in Elementor and save it the layout will be restored. So other than those frankly small issues it works. Obviously this may not work for everyone in every situation. I have been able to run this setup successfully on several sites and absolutely love the results and the ability to have all the wonderful tools from both available to me to use.
Conclusion
The conclusion here is to use both! Okay well, that’s not exactly a good way to finish out this article but it is an option if you need all the unique features that they both offer. As you may have figured out the consensus I mentioned at the beginning does seem to hold true. Elementor does seem to lean towards the designers while Beaver Builder leans toward the developer. I still wish one could do everything but that may not happen for a while, if ever.
So here is my opinion if you can only choose one and it’s pretty obvious in the end, if the website you are working on doesn’t need the three key advantages of Beaver Builder, use Elementor and take advantage of the amazing animation options and popup builder. If your site does need some more advances ACF integration with custom post loop layouts and theme builder options, use Beaver Builder. I suspect if you have the knowledge to use the advanced features of Beaver Builder you may be able to write the CSS and JS to create the animations found in Elementor but of course, it will be way more tedious and I have yet to find a good solution for a popup builder with all the same options as Elementor for Beaver Builder.
That seems to be the rub. The unique features of both builders could be incorporated into the other but only with a lot of additional work or additional plugins. In Elementor’s case a lot of additional PHP, in Beaver Builder’s case a lot of CSS and JS. If either builder were to someday incorporate the advantages of the other I would definitely choose whoever managed to it right. For now, I’ll keep both in pocket and watch as things continue to develop.


