
How to record the mouse cursor in the NVIDIA App
GeForce Experience is gone and the NVIDIA App replaced it, but the cursor still does not show up in your recordings. Here is the Windows level fix that actually works, with no extra software.
Prefer to watch a walkthrough?
There is no video for this one, but I cover recording, capture settings and creator tools on the channel. Subscribe to catch new tutorials the moment they go live.
The short version
The NVIDIA App will not record your mouse cursor and there is still no setting for it. The workaround lives in Windows, not in NVIDIA's software: switch on pointer trails in Mouse Properties, then open the registry and set the MouseTrails value to 70. At that number the trail stacks up behind the pointer and becomes invisible, while the cursor itself renders into every recording.
Two settings, no third-party softwareWhat changed: GeForce Experience is gone
When I first wrote this, the app in question was GeForce Experience. That app no longer exists. NVIDIA moved everything into the NVIDIA App, which left beta on November 12, 2024 and formally replaced GeForce Experience with driver release 566.36. It swallowed the old NVIDIA Control Panel at the same time, so driver updates, game settings, the overlay and capture now all live in one place. Any GeForce Experience install still hanging around will prompt you to migrate and then remove itself.
The capture engine underneath is the same ShadowPlay lineage, and the overlay picked up some genuinely nice upgrades, including AV1 recording at up to 4K 120 FPS. What it did not pick up is a mouse cursor option. That request is now years old and still unanswered, which is why this post still exists.
The NVIDIA App still will not record your cursor
I have used NVIDIA's capture tools for years to record everything from gameplay to tutorials. It is an incredibly convenient setup, since it ships with the GeForce drivers and it is genuinely user friendly. That is exactly why hundreds of thousands of people reach for it to capture what they are doing.
The trouble starts the moment you record your screen for instructional purposes. The overlay will not record your mouse, and there is no option to turn it on anywhere in the platform. That is especially annoying when you are building a tutorial and viewers need to see where you are clicking to get anything out of it. I still do not understand why this is the case.
Rather than abandon a capture tool that otherwise works well, I went looking for a way to get the cursor into my recordings, whether through a third-party program or some kind of extension.
First, turn on Desktop Capture
This step did not exist in the GeForce Experience days and it catches people out constantly. The NVIDIA App treats recording your desktop as a privacy setting, and it is off by default. If it is off, the overlay will not capture the desktop at all, cursor or no cursor.
- Open the overlay. Press Alt + Z, or use the overlay button at the top right of the NVIDIA App window.
- Open Settings using the cog at the top of the overlay panel.
- Scroll down to Privacy Control. It sits near the bottom of the settings list.
- Turn on Desktop Capture. Without this, desktop recording simply will not start.
While you are in Settings, it is worth opening Video capture and switching the codec to AV1 if your GPU supports it. You get noticeably smaller files at the same quality, which matters when a tutorial runs long. If you want the background on why that codec is such a leap, I wrote about the AV1 codec separately.
The fix: pointer trails, turned up until they vanish
After a lot of research I found nothing beyond switching to another program, which again is not what I wanted. So I took the problem back to basics and looked at the mouse properties in Windows to see what, if anything, could be done there.
There is an obscure option on the Pointer Options tab, under Visibility, called Display pointer trails. It leaves a trail of mouse cursors behind the original. I am not entirely sure who it was designed for, but it has one property that matters here: the trail actually does show up in a recording.
- Open Mouse Properties. Press Win + R, type main.cpl and press Enter. On Windows 11 you can also go to Settings, then Bluetooth & devices, then Mouse, then Additional mouse settings.
- Switch to the Pointer Options tab.
- Under Visibility, tick Display pointer trails.
- Leave the slider at Short and click Apply. The registry step below is what actually does the work.
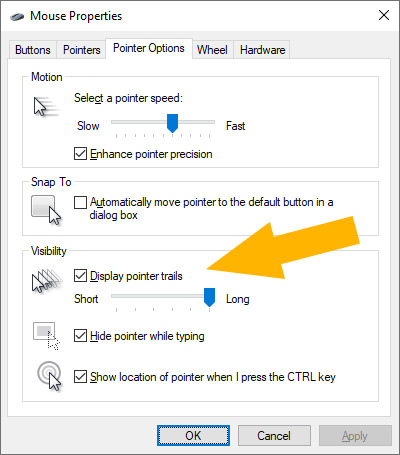
The catch is that using this option as-is looks terrible in the recording, even set to one notch. Unless you move the mouse really slowly you will still see that extra cursor drifting around behind the pointer, which looks awful in a tutorial. I thought that was another dead end, until I found out you can push the setting further than the slider allows by editing its registry value.
Editing the MouseTrails registry value
Editing the registry means editing the settings that run your operating system. The pointer trails value is not going to break your computer, but it still means going into a part of Windows that most people do not know exists and even more people should not be poking around in. Take that as the warning it is meant to be.
Before you start: this is the one step in this guide that touches the registry. Change only the value named below, and nothing else on the way past.
- Open the Registry Editor. Press Win + R, type regedit and press Enter.
- Navigate to HKEY_CURRENT_USER\Control Panel\Mouse.
- Double click MouseTrails. It is a String value, and it will currently hold whatever the slider set, normally a number from 2 to 7.
- Replace the number with 70 and click OK.
- If nothing looks different straight away, sign out and back in so Windows re-reads the value.

For some quirky reason, setting the pointer trail value really high actually makes the trails invisible. My best guess is that there are now so many cursor copies that they simply stack up behind the pointer instead of stringing out behind it as you move.
Turning the trail length absurdly high does not make the trail longer, it makes it disappear.
Trails at 2 the slider minimum
- The cursor does record, so the core trick works
- A ghost cursor visibly drags behind the pointer
- Only looks acceptable if you move very slowly
- Distracting in a tutorial, which defeats the point
Trails at 70 the registry value
- The cursor records exactly as you see it
- The trail itself is completely invisible
- Move the mouse at any speed you like
- Toggle it off any time from Mouse Properties
Recording with the cursor visible
With Desktop Capture enabled and the trail value set, your recordings will show the mouse cursor perfectly. Nothing about the way you record changes.
- Start and stop a manual recording with Alt + F9, or from the Record panel in the overlay.
- Save an Instant Replay clip with Alt + Shift + F10 if you would rather run a rolling buffer and keep the good bits.
To turn the cursor effect off again, open Mouse Properties and simply untick pointer trails. The nice thing is that the registry value stays where you put it, so when you tick the box again later it comes straight back at 70 with no second trip into regedit.
Frequently Asked Questions
Does the NVIDIA App record your mouse cursor?
No. The NVIDIA App, like GeForce Experience before it, does not capture the mouse cursor in screen recordings, and there is still no built-in option to switch it on.
How do I make my cursor show up in NVIDIA recordings?
Turn on Display pointer trails in Windows Mouse Properties, then set the MouseTrails registry value to 70. The cursor then renders into the recording while the trail itself stays invisible.
What is the MouseTrails registry value?
It is a String value stored at HKEY_CURRENT_USER\Control Panel\Mouse that controls how long the pointer trail is. The Windows slider only offers 2 through 7, but you can type a far higher number directly into the registry.
Why does a higher trail value hide the trail?
With a very high count the cursor copies stack up directly behind the pointer instead of stringing out behind it, so you see a single cursor while Windows still draws it into the recording.
Does this slow down my PC?
It can on lower end machines, because Windows is still rendering about 70 cursors. Turn pointer trails off in Mouse Properties when you have finished recording.
A fix that should not be necessary
One word of warning before you go: this setting may affect performance on lower end computers, since Windows is still rendering 70 cursors in the background. On a modern machine you will never notice it, but it is worth knowing if your system is already working hard while you capture.
Anyway, that is it. A fairly simple solution to a problem that should not exist in the first place, and one that has now survived an entire change of application. If NVIDIA ever adds a cursor checkbox to the overlay, this post can happily become obsolete. Until then, I hope it helps.
Disclosure: This post contains affiliate links. As an Amazon Associate I earn from qualifying purchases, at no extra cost to you. Affiliate links like these and my YouTube channel are what keep the site running.