SketchUp's Push/Pull is one tool. Blender splits it up, and the pull half, Extrude, is more powerful than the original. Part three covers extruding, the one thing Blender cannot do, and the loop-cut workaround.
Editor's note (July 2026): Written for Blender 2.8, and it all still holds in current Blender (4.x and 5.x). E still extrudes, Ctrl+R still makes loop cuts, and X still opens the delete menu. Blender still has no single destructive "push" like SketchUp's, so the Knife tool and the Boolean modifier remain the way to cut through geometry. New here? Start with Part 1 and Part 2 first.
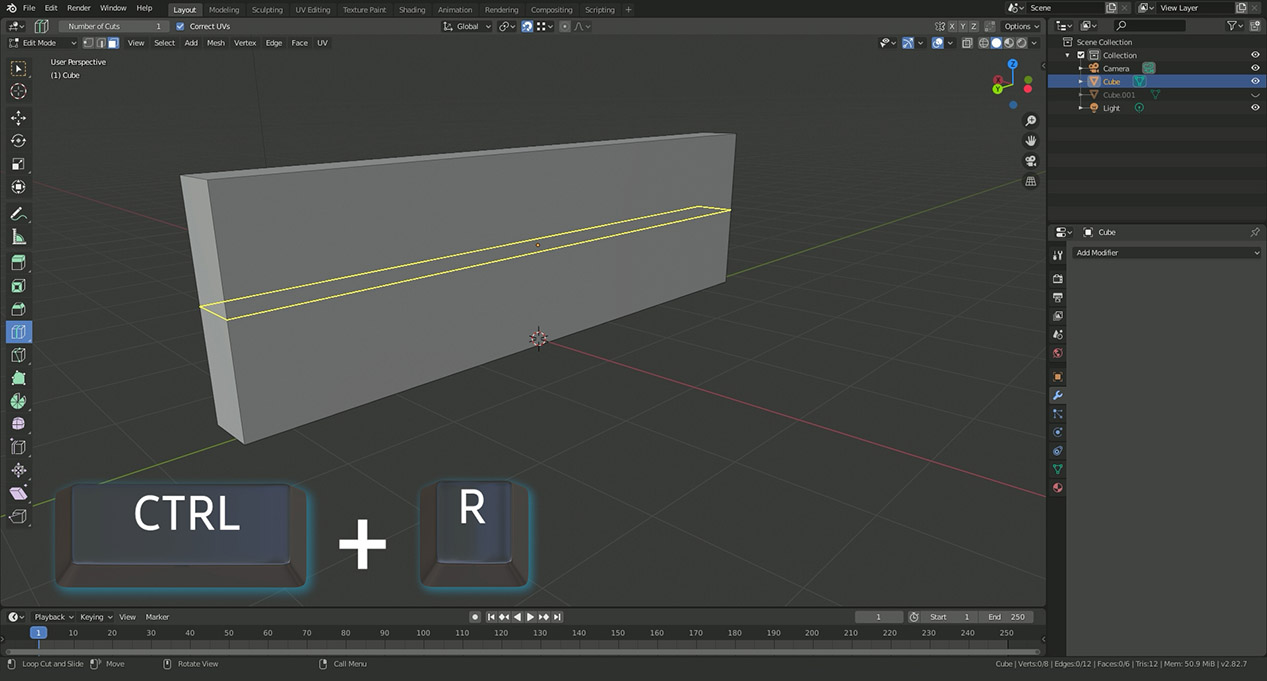
SketchUp's Push/Pull becomes the Extrude tool in Blender: press E and drag, exactly like the grab tool. Extrude is more flexible, but it always adds new geometry and it will not punch a hole clean through an object the way Push does. To cut openings like doors and windows, you use loop cuts (Ctrl+R), extrude inward, and delete the leftover faces.
Press E to pull. There is no one-key push.SketchUp gives you one tool, Push/Pull, for quickly pushing and pulling geometry. Blender splits those jobs up, and the pull half is the Extrude Region tool, which is actually more versatile than SketchUp's version. This builds on the last two lessons, so if you have not read Part 1 and Part 2, go through those first.
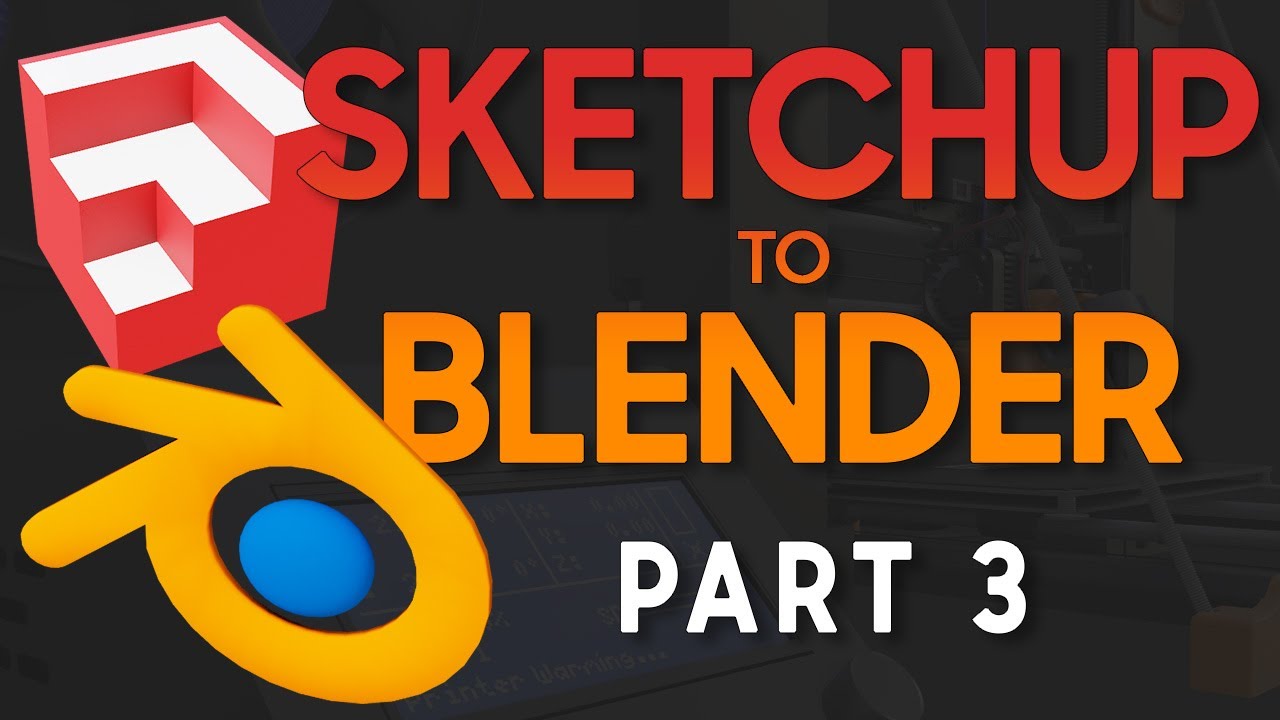
To extrude, select the geometry you want in Edit Mode, then either click the Extrude Region button in the left toolbar and use the on-screen handle, or, as I prefer, press E and carry on just like the grab tool from Part 1. Hold Shift as you drag to slow the movement down for finer accuracy.
Extrude is not just a rename of Push/Pull. It does more in three important ways:
That last point is worth a beat. Clean topology is a big topic on its own, but the short version is this: if you keep pulling faces along one side of an object without new geometry, you end up with a single face carrying a ton of edges, which is not good practice. Extrude making new faces every time keeps your mesh tidy.
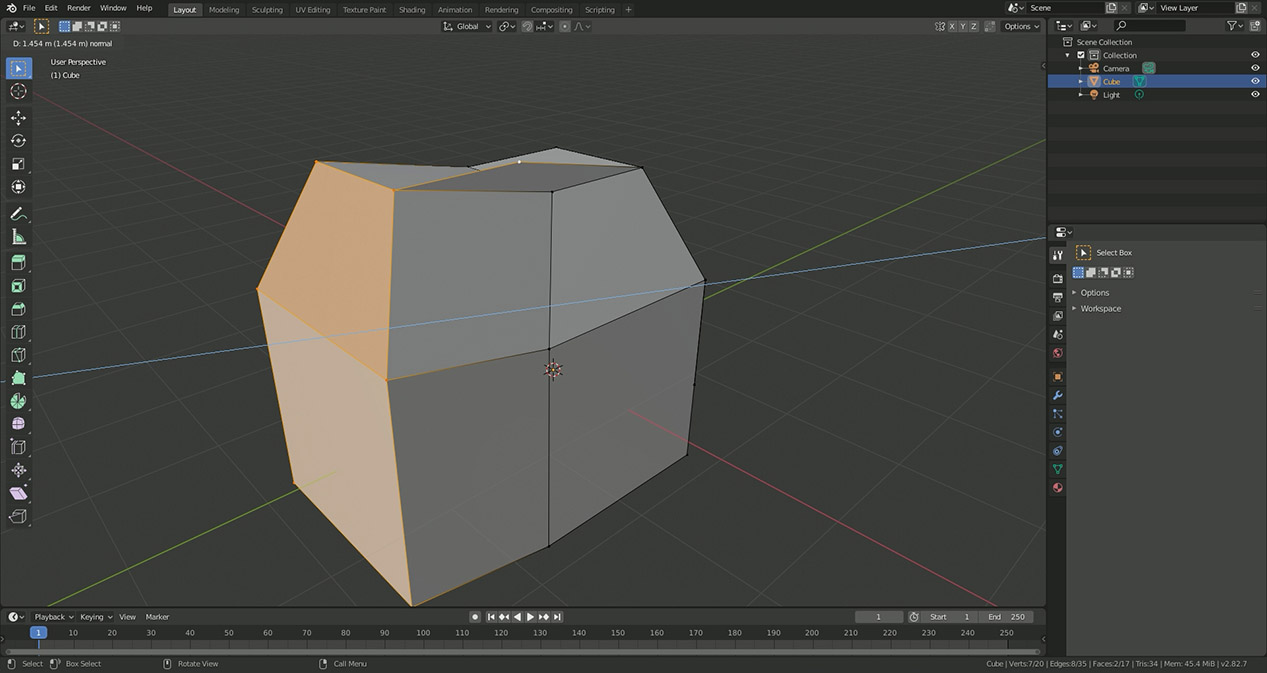
Here is where I will admit Blender falls short, and it is about the only time in this series I will say that. The push part of Push/Pull is technically missing. Extrude can push a face inward, but it will not destroy the geometry it runs into. It cannot, say, punch a hole through the opposite side of a cube the way SketchUp's Push does automatically.
From what I can tell, the reason is that Blender has many different ways to cut into objects, so it does not build that behavior into Extrude. Instead you reach for a dedicated tool: the Knife tool, or one of the modifiers, most often the Boolean. It is more steps than SketchUp for this one job, but it also gives you far more control over the result.
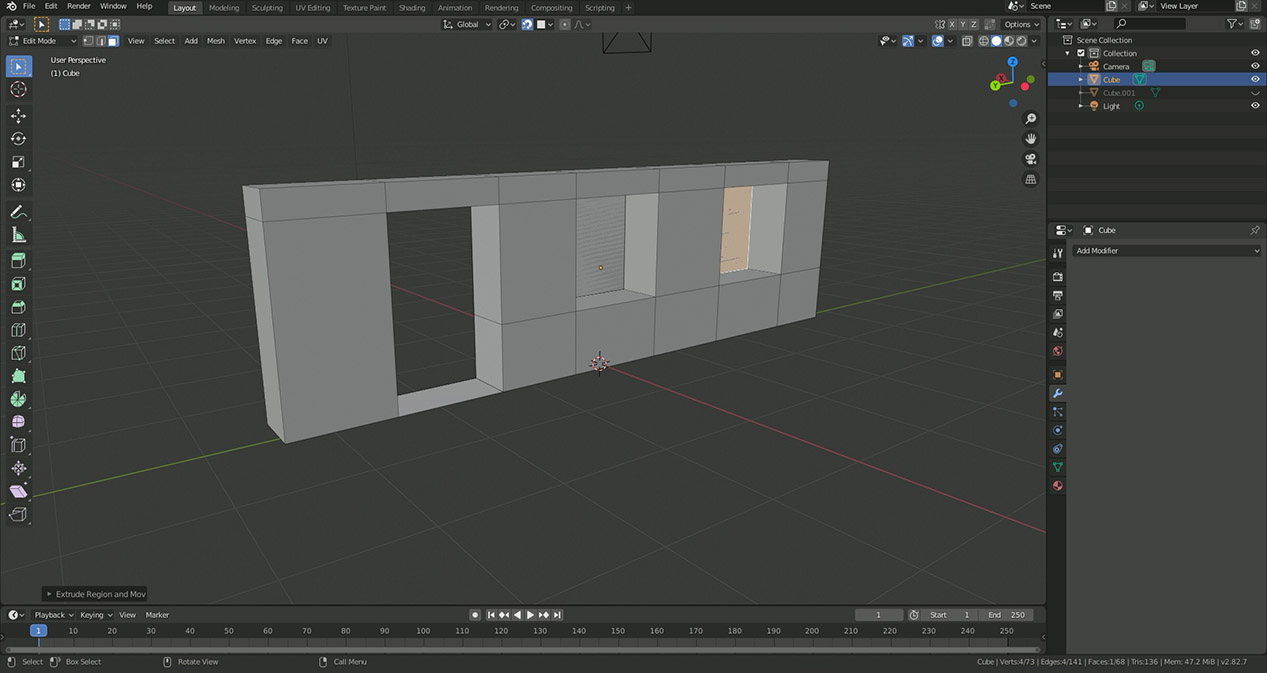
For the common case, cutting openings like doors and windows, there is a clean workaround using loop cuts. A loop cut adds a ring of edges around your model so you have geometry to work with.
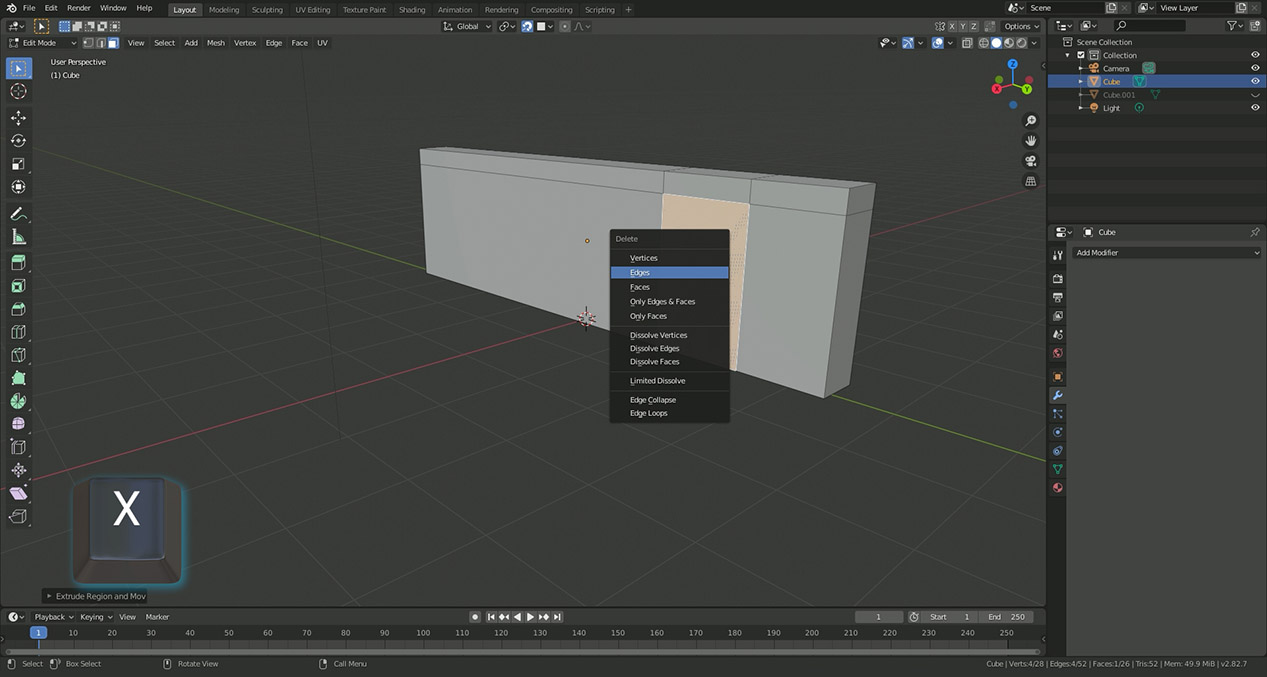
One quirk to expect: there will be two faces to delete, not one. All the extrude did was pull one face across and set it on top of another. In SketchUp, pushing through would have deleted both faces for you. In Blender you clean them up yourself, and then you have your opening. The same steps frame and cut a window: loop cuts for the frame, extrude through, delete the interior faces.
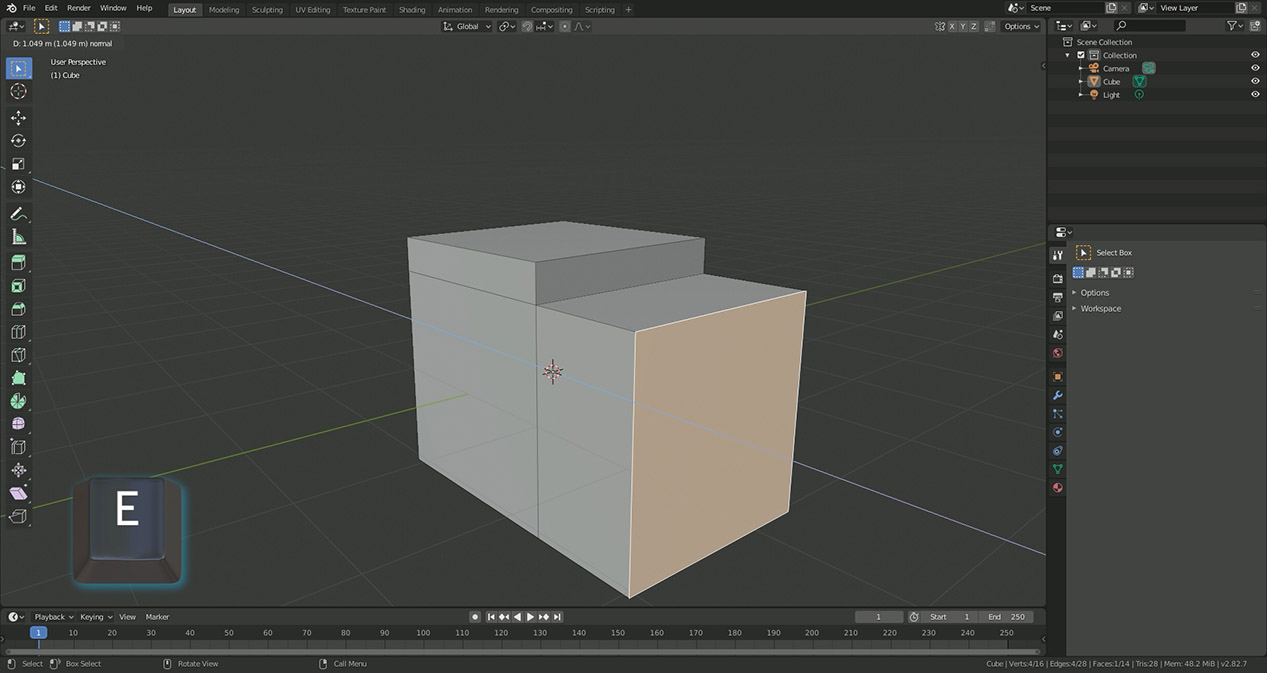
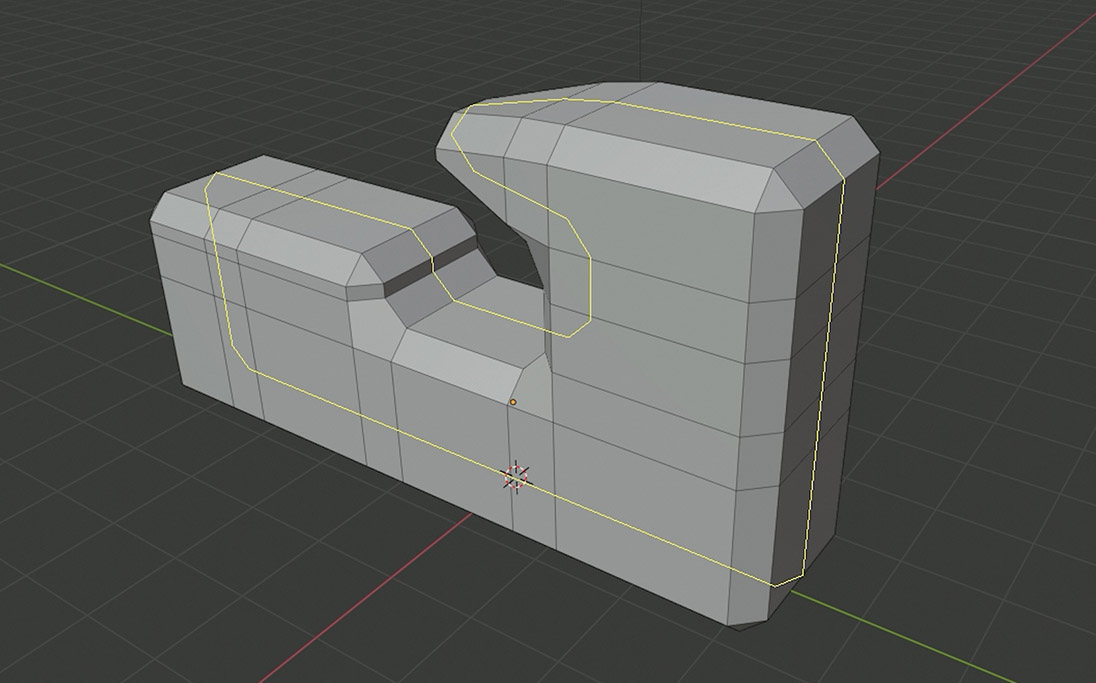
Loop cuts have one rule worth burning into memory: a cut only runs a complete loop around your model as long as every face along its path has four edges, a quad. Hit a face with three edges, a tri, and the loop stops dead there.
In the example below, the loop completes in one direction but not the other, because a corner along that path is a three-sided face. This is exactly why keeping your geometry clean, and your faces as quads, matters so much in Blender. Good topology is not fussiness, it is what makes tools like loop cut actually work.
The Extrude Region tool. Select geometry in edit mode and press E, then drag like the grab tool. It covers the "pull" half of Push/Pull and is more flexible, since it works on vertices, edges, and faces.
In edit mode, select the geometry and press E, then move the mouse and click to place, exactly like the grab tool. Hold Shift while dragging to slow the movement down for finer control.
Blender's Extrude does not destroy the geometry it runs into, so it will not punch straight through. To cut through an object, use the Knife tool or a Boolean modifier instead, which give more control than SketchUp's Push.
Frame the opening with loop cuts (Ctrl + R), extrude the face inward and snap it to the opposite side, then press X and delete the two leftover faces. That leaves a clean opening through the wall.
A loop cut only continues while every face on its path is a quad, a four-sided face. If it reaches a triangle, the loop stops there. Keep your topology clean and your faces four-sided so loops run all the way around.
Between the last three lessons you can now grab, move, and extrude geometry, which is most of the day-to-day of modeling. The missing push takes a couple of extra steps, but loop cuts and a face delete get you there, and clean quad topology keeps everything working smoothly.
Next in the series we tackle precise measurements, getting geometry to an exact size. It took me a while to figure out, and once I did it made getting spot-on dimensions for my 3D-printing prototypes so much easier. Until then, practice and practice some more.
Disclosure: This post contains affiliate links. As an Amazon Associate I earn from qualifying purchases, at no extra cost to you. CK Tech Check is 100% ad-free: no banner ads, no ad tracking. Affiliate links like these and my YouTube channel are what keep the site running.