Putting a photo or texture on a face in SketchUp is easy. Blender takes it further with UV mapping, which is more work up front but gives you real control over how images sit on your model.
Editor's note (July 2026): Written for Blender 2.8, and the UV workflow here is unchanged in current Blender (4.x and 5.x). The Image Texture option on Base Color, the U unwrap menu, Mark Seam, Smart UV Project, and the UV Editing workspace all work exactly as described. One small update: the free texture site the video recommends, cc0textures.com, has since rebranded to ambientCG.com (same free CC0 textures). This follows Part 5 (materials); start at Part 1 if you are new.
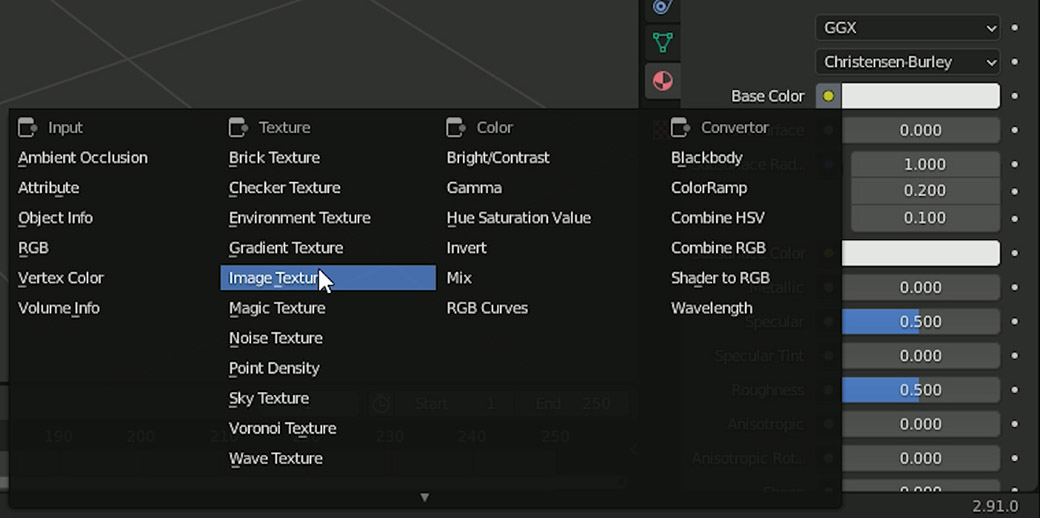
To put an image on a model, click the little dot next to Base Color and choose Image Texture, then open your file. To control how it lands on the surface, you UV unwrap: Blender lays your faces out flat so you can map the image onto them. Enter face select, press U, choose Unwrap, and use the UV Editing workspace to line things up. For bigger models, mark seams first so Blender knows where to cut.
Image Texture, then unwrap to place it.Start by creating a new material, then look at Base Color. Between its label and the color bar is a small options dot (a little pip). Click it, and from the popup choose Image Texture. The color picker is replaced with texture options. Click Open, browse to your image, and select Open Image. Switch the viewport to Material Preview and the image shows on the model.
That gets the image on there, but it will probably be stretched or misaligned, because Blender does not yet know how the flat image should wrap around your 3D shape. That is what UV mapping is for.
A UV map is a flat representation of a 3D surface, the canvas you map your image onto. Unwrapping is taking all the faces of your model and laying them out on a 2D plane, kind of like undoing an origami figure back into a flat sheet of paper. The U and V are just the 2D equivalents of the X, Y, and Z axes you already know, and the idea shows up in almost every major CAD program.
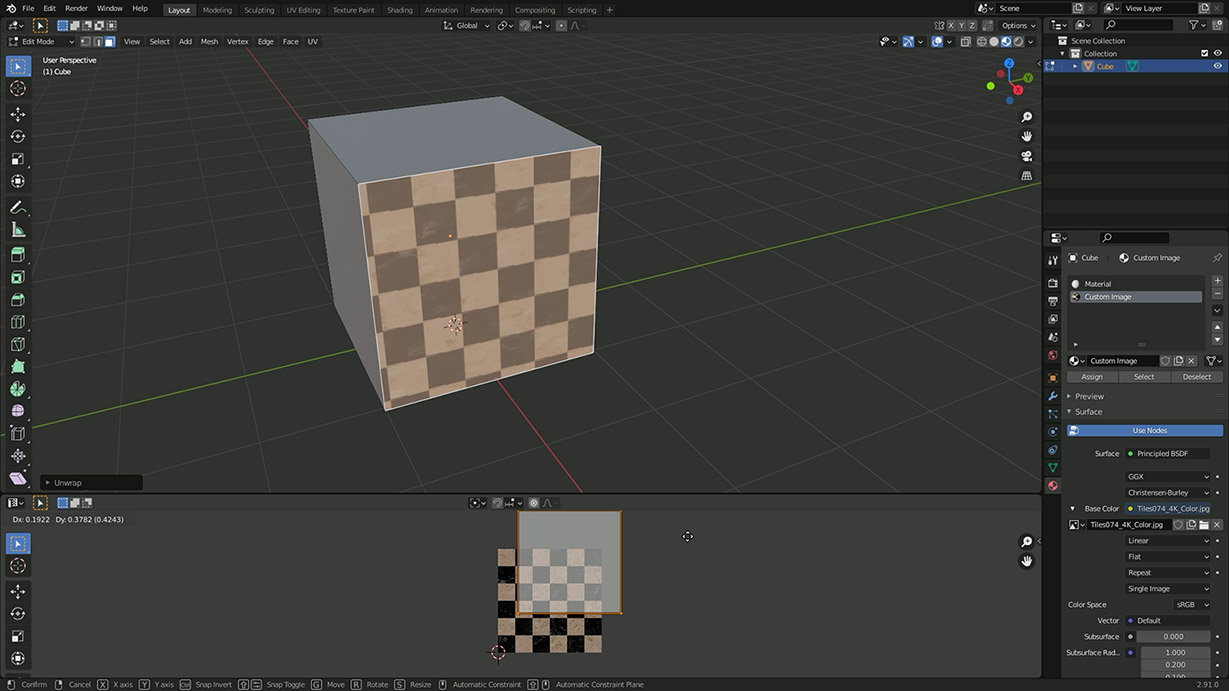
To work on it, split your viewport so you can see the model and the flat layout side by side. The easy way is to click the UV Editing workspace tab across the top, which sets up the split for you: the UV Editor on one side shows your unwrapped faces and the image, the 3D view on the other.
The real Blender gurus will not love me for this, but since we are used to applying materials to individual faces in SketchUp, I will do the same here and unwrap one face at a time to start. Enter face select mode, click a face, right-click to open the Unwrap sub-menu (you can also open it on its own with U), and choose Unwrap.
Now the key mental shift: we are not manipulating the image to fit the face, we are manipulating the face to fit the image. In the UV Editor, move, rotate, and scale that face over the image until the part you want lands where you want it. One thing to know: the 3D view and the UV Editor work independently for transforms and selection, so scaling a face in the UV Editor does not scale it in the model, and vice versa.
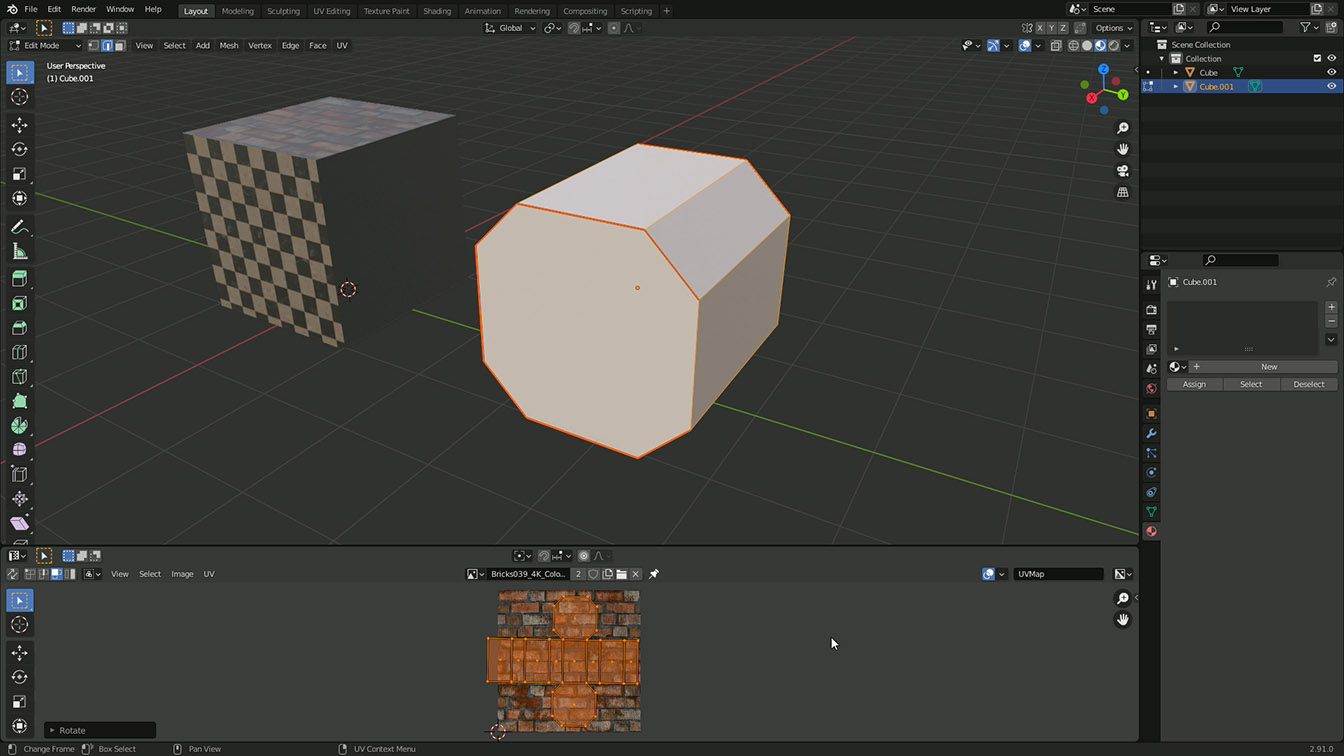
Face-by-face is fine for a cube, but on a real model it gets impractical fast. Primitive shapes like cubes come pre-unwrapped when you add them, but custom models need you to tell Blender where to cut, using what it calls seams. Think of them like the seams on a piece of clothing: the lines where the flat pattern comes apart.
Seams are not the only option. Algorithms like Smart UV Project can unwrap for you, and each one produces a different layout, so it is worth experimenting to see which suits a given model. For a quick bevelled cube to test on, select some edges and bevel them with Ctrl+B first.
Create a material, click the small dot next to Base Color, choose Image Texture, and open your image file. Switch the viewport to Material Preview to see it. To control how it sits on the surface, UV unwrap the model.
UV mapping is laying a model's faces out flat on a 2D plane so you can map an image onto them, like unfolding an origami figure back into paper. The U and V are the 2D equivalents of the 3D X, Y, and Z axes.
In edit mode, select the faces or the whole model, press U, and choose Unwrap. For custom models, first select edges and use U then Mark Seam to tell Blender where to cut, then unwrap. The UV Editing workspace shows the result.
Seams are the edges you mark for Blender to cut along when unwrapping, like the seams on clothing. Select edges in edge mode, press U, and choose Mark Seam. Marked edges turn red, and unwrapping opens the model along them.
ambientCG.com, formerly cc0textures.com, offers free CC0 textures you can use in any project. Download the image, then load it as an Image Texture on your material's Base Color.
One limitation with this method: the images want to be completely opaque. You can load a transparent PNG, but it leaves an odd background you do not really have control over. Getting proper transparency, and layering images, takes a slightly different approach using Blender's material node system.
That is exactly where we go next: putting multiple images, including transparent ones, on a single face with nodes. It is where materials start getting really powerful.
Disclosure: This post contains affiliate links. As an Amazon Associate I earn from qualifying purchases, at no extra cost to you. CK Tech Check is 100% ad-free: no banner ads, no ad tracking. Affiliate links like these and my YouTube channel are what keep the site running.